Just as your staff have different areas of responsibility, user access in MYOB Business is designed so that you can give them access to only the parts of your business data they need to work on. You can control:
what parts of a file a user can access
what files and services users can manage.
Looking to manage account access for subscriptions and billing?
For help managing who can interact with MYOB on behalf of your business, which includes things like changing subscription or billing details, see Manage account contacts.
For an overview of the different types of MYOB access, see Understand MYOB accounts and file access.
Manage user access from the Users page
Everyone who has access to your MYOB business file is listed on the Users page, accessed by clicking the settings menu (⚙️) and choosing Users and permissions.

Can't see the Users page?
Whether you can invite users depends on your user type. Only an Owner, Advisor or Online Admin user type can access the Users page and add or remove other users. A File User with the Administrator role can view the Users page, but doesn't have the ability to add or remove other users.
See 'User type controls file access', below.
The Users page is where you can:
invite users and advisors to access to your MYOB business
choose which parts of your MYOB business users can access
check a user's status
When you add a user, they'll be sent an invitation to access your MYOB business. The invitation has all the info they'll need to get started.
Typically, you'll invite anyone who needs to sign in to your MYOB business. This includes your accounting advisor or bookkeeper. That's right – no need for office visits or sending them your data.
Everyone you invite will be able to access your MYOB business at the same time. But you'll keep your data safe by choosing which parts of your MYOB business each user can access.
Creating users and advisors
When you invite someone to access your MYOB business, you'll choose whether they'll be a User or an Advisor.

User
A User is typically an internal team member who needs day-to-day access to the file to perform operational tasks, such as entering invoices, taking payments or running payroll.
You can control what files a user can access, what parts of the file they can work on, and whether they can manage the file access of other users.
Advisor
An Advisor is usually an accountant, bookkeeper, or tax agent who needs access to your file to provide professional services, such as tax preparation, compliance, or bookkeeping.
Only invite an Advisor if there isn't one already invited to the business, or you want to invite another practice or bookkeeper.
An Advisor (with the Administrator role) can invite others to the file and set up Bank Feeds. If you are an Advisor and need to invite your practice staff, you can do this from your practice software.
Control what parts of a file a user can access
Roles and permissions, in the Access section of the user details page, control the parts of your MYOB business a user or advisor can access.

For example, a user with the Sales role can only access sales-related functions and reports. But the Administrator role gives a user access to all features and functions.
You choose a user's roles when you invite them. See create users or create advisors.
Available roles and permissions
Roles and permissions rules:
You must assign roles and permissions to be able to create a user.
You can assign multiple roles and permissions to a user.
Only users with the Administrator role can change other users' roles and permissions.
List of roles and permissions
You'll choose a user's roles when you invite them. See create users or create advisors.
Only users with the Administrator role can change other users' roles and permissions.
If your plan charges payroll fees, only Administrator, Accountant/Bookkeeper and Payroll roles can incur fees on behalf of your business. For details see Payroll limits and fees.
Here's a list of available roles and the functions they permit.
Administrator - All features and functions, including user management and all sections of the Dashboard.
Accountant/Bookkeeper - All features and functions, excluding user management and all sections of the Dashboard.
Sales:
All features in the Sales menu
All invoicing features in the MYOB Assist app
Sales reports
Customer reports
Custom reports
The Invoices section of the Dashboard, showing only invoices (but not other income, like cash received). The amounts are shown as tax-inclusive only.
Purchases:
Features in the Purchases menu
Users with the Purchases role can't use electronic payments to pay suppliers. If a user needs this feature, assign them either the Administrator, Accountant/Bookkeeper, Banking or Payroll role.
Expense capture function in the MYOB Assist app
Purchases/Bills reports
Supplier reports
Custom reports
The Bills section of the Dashboard, showing only bills (but not other expenses like wages and cash purchases). The amounts are shown as tax-inclusive only.
Payroll :
All features in the Payroll menu
Payroll reports
Employee reports
Custom reports
The Pay runs section of the Dashboard
Banking:
All features in the Banking menu
Banking reports
Expense capture function in the MYOB Assist app
Contact reports
Custom reports
The Bank accounts section of the Dashboard
Contacts:
All features in the Contacts menu
Create and edit customers in the MYOB Assist app
Expense capture function in the MYOB Assist app
Contact reports
Custom reports
Field: Gives permission to MYOB Assist app only, for on-the-go mobile tasks:
Quotes
Invoicing
Expense capture
Users with this role can’t:
Edit online payment settings
Access features in MYOB Business
More about MYOB Assist user access
Decide whether a user can make changes
New users are created with the Create and edit access level set by default. This means they can create and edit transactions related to their role. For some roles and permissions (except the Administrator role), you can choose to set an existing user's access level to Read only.

This is useful for when you want to allow a user to view the details of transactions but not create new ones. For example, you might give a salesperson read-only access so they can view details of existing sales but not allow them to create new ones.
Control file management
When you invite a user or advisor, you choose their User type. This determines what files they can access (if you have multiple files), what services they can manage and who they can invite into files.

User types
The available user types are:
Owner: the primary user for an MYOB Business file, usually the person who set up the subscription and created the file. They can manage user access and online services, including Online Payments and Bank Feeds. Only the current Owner can transfer ownership.
Online admin: has the same user management and online services permissions as the Owner, but can’t transfer ownership.
Advisor: an accountant, bookkeeper or other business advisor. They have the same user management permissions as an Online admin, can set up Bank Feeds and can also invite their practice staff to the file using their practice software.
File user: works in one MYOB Business file but can’t invite other users.
User type controls file access
The user type determines whether the user can access one business file or other files with the same serial number:
Owner, Online Admin, Advisor: can work with any MYOB Business file that's listed under the owner’s software serial number.
File User: can only work on the MYOB Business file they're invited to, even if you have multiple MYOB businesses.
Only Owners, Online admin users, or Advisors with the Administrator role, can set up bank feeds.
User type determines invitation rights
Your user type controls who you can invite to a file. For example, an Owner can invite others, but a File User can't. This keeps your business data safe.

The ability of Online admins and Advisors to invite other Online admins is still being rolled out. If this option isn't in your file yet, the Owner can do it.
Need to change another user's access? Your user access also determines what changes you can make to other users. See Edit and delete users.
Check a user's status
When you invite a user to work with your file, you can keep track of their status on the Users page. This is also where you can cancel or resend invitations.
The Status column shows at what stage a user is in the invitation process (like when they were invited or if their invitation has been cancelled or expired) and whether they're an active or inactive user (that is, whether they can access the MYOB file).

Click the pills across the top to filter the Status column.
This status... | Means... | Typical action... |
|---|---|---|
Active | The user accepted the invitation. | Nothing – unless you want to change or delete the user |
Invitation sent | The user has been invited but hasn’t accepted yet. They can’t access the file until accepting the invitation. | Resend the invitation. Invitations expire after 10 days – after this, the user will have a Status of Invitation expired. |
Access removed | The user's access has been revoked. | Nothing – unless you want to reinstate their access. You'll need resend the invitation. |
Invitation cancelled | The invitation was cancelled (by you or another user who has access to do so) and can’t be accepted. | Resend the invitation if you still want the user to access your file. |
Invitation expired | Invitations expire after 10 days if they're not accepted. | Resend the invitation if you still want the user to access your file. |
Inactive | The person is still listed in your file, but their access has been turned off. | You can reactivate an inactive user if they need access back. |
Where to from here?
Find out how to create users or create advisors. If you've been there, done that – maybe you need to edit or delete a user.
Controlling who can access your company files and what access they have is vital to keeping your data secure.
As employees leave or change their roles within your business, their access to your data will also need to be changed or removed.
Anyone who needs to access your company file will need a user account, and you can add as many users as you need. When you set up their user account you'll also specify which parts of AccountRight they can access by assigning company file roles. AccountRight comes with an Administrator user account which gives access to all features and functions (you can add additional administrators if you want).
Looking to manage account access for subscriptions and billing?
For help managing who can interact with MYOB on behalf of your business, which includes things like changing subscription or billing details, see Manage account contacts.
For an overview of the different types of MYOB access, see Understand MYOB accounts and file access.
User accounts
A user account is like a key to your company file. It also lets you identify who is accessing your company file and any changes they make. You can create user accounts for whoever you choose, including work colleagues and business advisors - such as your bookkeeper or accountant.
To set up user accounts, you need to be signed in to your company file with the Administrator account, or be a user who has been assigned the Administrator role.
Learn how to:
Company file roles
Roles are used to control access to windows and functions in AccountRight. There are default roles that you can assign to your users, or you can create your own.
To assign roles, you need to be signed in to your company file with the Administrator account, or be a user who has been assigned the Administrator role.

Learn about:
Administrator user account
When you created your company file, a user account called Administrator was automatically created. By default, the Administrator user account doesn't have a password assigned (learn how to set a password).
The Administrator user account is automatically assigned the Administrator role which gives access to all features and functions in AccountRight. As such, this role should not be removed from the Administrator user account. Learn more about other ways you can protect your AccountRight company file.
The Administrator user account, or a user assigned the Administrator role, can perform the following:
Change a user's company file access (such as their user name and role)
FAQs
Why can't I select the "Read Only" or "Inactive User" options?
The Read Only and Inactive User options won't be selectable if a user has been set up with the Administrator role. To allow these options to be selectable:
Click to select the user from the list of Company file users.
Deselect the Administrator role.
Select any other role.
Click Save. The Read Only and Inactive User options are now selectable.
If you're asked about changing the user's online access to the company file, click No.
Select the Administrator role and deselect the other role you chose at step 3.
Select the Read Only and/or the Inactive User option (as needed).
Click Save.
How do I delete a user?
Users can be deleted if they:
have not recorded any transactions in the company file, and
are not assigned the Administrator role.
To delete a user:
Go to the Setup menu and choose User Access.
Click the user to be deleted then click the recycle bin icon.
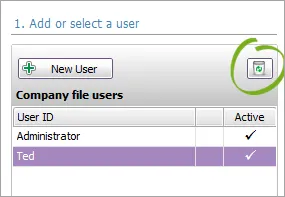
Click Yes to confirm.

Note that the company file's original Administrator user cannot be deleted.
Getting a message about "Cannot delete a user in the Administrator role"?

This means the user you're trying to delete has been assigned the Administrator role. To delete the user, deselect the Administrator role against this user and select any other role. Save your changes then delete the user.
How do I see what transactions have been made by users for a selected period?
You can use the Journal Security Audit report to check for unauthorised transactions made by users. See Company file security audits.