When your clients' provisional tax or terminal tax due dates are approaching, you need to send them a tax notice that specifies the due date, the amounts to be paid and which tax types to pay to.
You can send tax notices to your clients:
by email or by creating a portal task in Practice Compliance, in bulk or one at a time
manually, by downloading a copy.
If your Practice Administrator has set an email address CC option, that practice email address will receive a copy of the tax notice email that is sent to your client. Practice Administrators can read more about how to set this option, here.
If you use Tax Manager in MYOB AE/AO on the desktop, read section 8. Send notices of the Tax notices workflow for important information.
Prepare the tax notice email or Portal task settings
Before you begin:
If you plan to use the Portal option but haven't already created a Portal for your client, see Create client Portals.
If you want to receive an email notifying you if a tax notice email can't be delivered, you can also set up a practice alias.
If you want your practice to receive a copy of the tax notice email sent to your client when you use the email option, ensure your Practice Administrator has set the email address CC option.
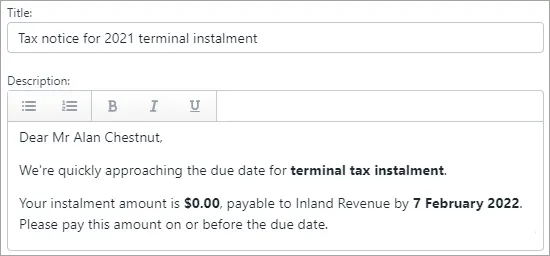
Your Practice Administrator can edit the default text of tax notice emails or Portal tasks. If you're sending an individual tax notice rather than multiple tax notices in bulk, you can also edit the text once-off when you click Send to client from the Tax notices page.
If a logo or footer has been set, it will be included in the email. Practice Administrators can edit the logo and footer.
When you send tax notices in bulk as a task, the Bulk task assignee will be the assignee of the task. The bulk task assignee may have been set when you created client portals. Otherwise, you can edit a client portal.
If you migrated from MYOB AE/AO to Practice Compliance, we set some default options for sending tax emails to clients in Practice Compliance.
-
In AE/AO, if there's an email address in Tax Email or Email (primary contact email address), the Send email to client option is selected in the Practice Compliance delivery preferences.
-
In AE/AO, if the email addresses are blank, Send Manually is selected by default in the Practice Compliance delivery preferences.
If you need to add or change an email address in Practice Compliance, edit the Tax Email or Email address in AE/AO.

You can also set a sender alias by Editing your default portal details. This lets portal tasks and emails to clients from Practice Compliance be sent from an alias name and email that you’ve set up. Otherwise, tasks and emails sent from Practice Compliance will continue to use the logged-in user as the sender.
Select a client on the client side menu, and click the Settings icon (the grey cog) on the top right of the page.
Scroll until you see the Tax notice settings, then click Edit.
If you see a message about communication security, click I understand.

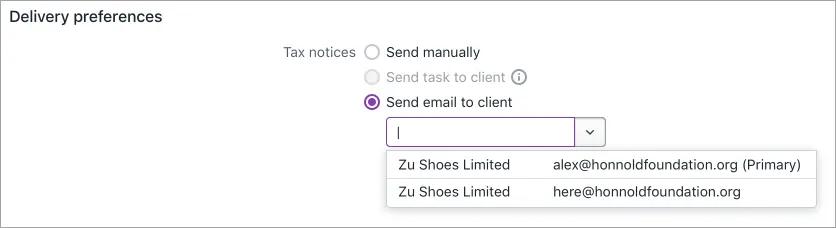
Under Delivery preferences, select Send email to client or, to use the Portal option, Send task to client.
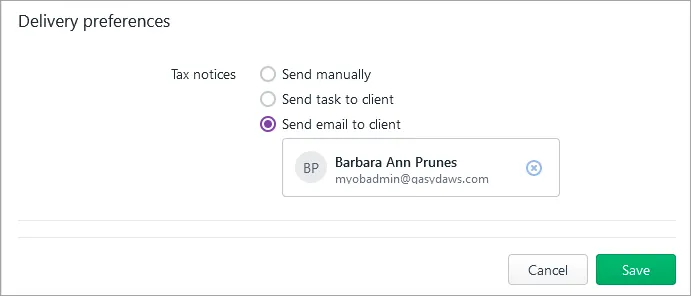
If you selected Send email to client, you can search for a contact, or click the field to see suggestions of email addresses linked to the client.
Click Save.


Send a tax notice by email or Portal task from Practice Compliance
Whether a client receives tax notices by email or as a Portal task depends on the delivery preferences you set when preparing the email or Portal task.
-
When you send tax notices in bulk as a task, the Bulk task assignee will be the assignee of the task.
-
Before you can send a tax notice, the status of the tax notice must be Ready for client. If it's still In review, make sure you approve it first to make it ready for clients.
-
Email wording can only be changed when sending an individual tax notice in the client-centric view, not when sending in bulk in the All clients view.
-
Check that your client's email address is correctly entered. If a client's email address is invalid, you'll receive an error message. Correct the email address by changing it in AE/AO.
To send an individual tax notice:
Select a client in the side menu and go to Tax > Tax notices.
Click Send to client.

Confirm that the email or task details are correct, and edit the title or description as needed.
Click Send or Create task. The tax notice status changes to Sending and then Sent. An email is sent to your client with the tax notice attached or as a notification to review the task.
Sending can take up to 30 minutes.
If sending takes more than 4 hours, you'll see a message and the status will go back to Ready for client, so you can try again.
If you can't see the Sending status at all, try clearing your browser's cache.
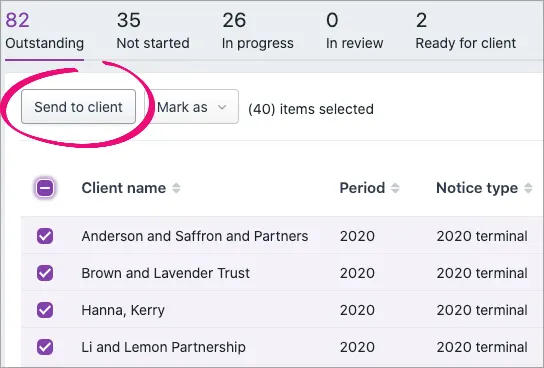
To send tax notices in bulk:
Select All clients and go to Tax > Tax notices.
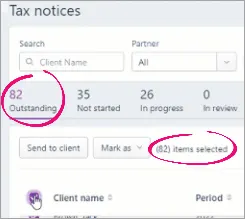
Either select specific tax notices or select them all in one go.
To ensure good speed and performance, send no more than 80 tax notices at a time.
To individually select the tax notices you want to send in bulk, select the checkbox next to each tax notice.
To select all the tax notices, select the Client name checkbox at the top of the list.
If you've got more than 40 outstanding tax notices, you'll need to scroll down to load more tax notices. Practice Compliance only loads 40 at a time to avoid long load times.
Once all the tax notices are loaded, select the Client name checkbox again.
To confirm that all tax notices are selected, compare the Outstanding status number to the number of items selected displayed at the top of the list.
Click Send to client.
The Mark as options only change the status in Practice Compliance. For example, if you choose Mark as > Sent, the tax notice won't be sent to the client. To send the tax notice, you need to select the Send to client button next to Mark as.
The Send to client window shows you a summary of tax notices that can be sent, and reasons why some may not be able to be sent.
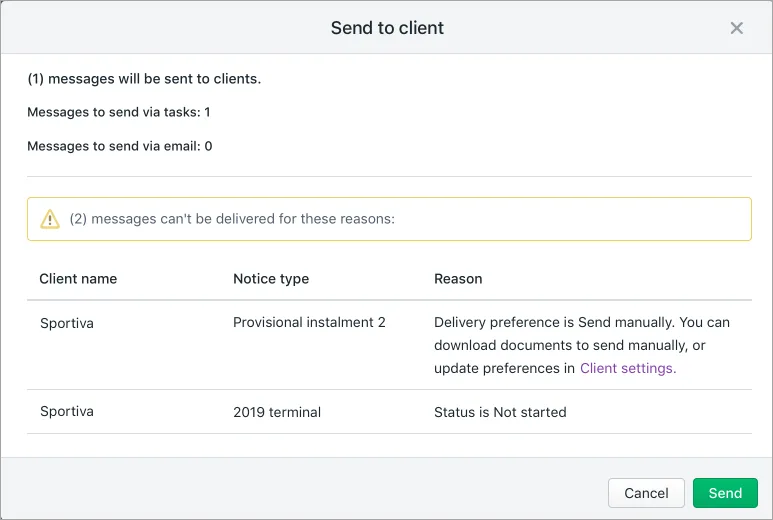
Review the details in the window and click Send.
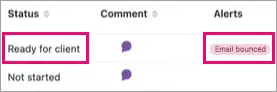
Keep an eye out for alerts about emails not being delivered. If emails can't be delivered, you'll see an Email bounced notification in the Alerts column in the Tax notices page. The tax notice status will also change from Sending back to Ready for client.
If you've set up a practice alias, you'll also get an email notification to that reply email address telling you that the tax notice email couldn't be delivered.


When your client pays the provisional tax amount or terminal tax amount, and the payment is reconciled in Data reconciliation, on the tax notice, click Mark as and select Paid.
A copy of the tax notice PDF is stored in Documents in Practice Compliance, but the email is not stored in Documents in Practice Compliance. If you sent the tax notice using the email option and your Practice Administrator has set an email address CC option, that practice email address will receive a copy of the tax notice email that was sent to your client.
-
You may find it useful to set up a shared email address to use as the inbox for tax notice emails. That way, everyone in your practice with access to the inbox can search for tax notices for a particular client.
-
If you use AE/AO and Document Manager, you may find it useful to save the tax notice emails and store them in Document Manager using the Share It feature.
Download a tax notice to send to a client manually
When downloading a tax notice to send manually, it's important to update the tax notice status to Ready for client, before downloading the tax notice PDF. Otherwise, the tax notice PDF will display Draft watermark.
Click View (PDF) to view and download a PDF of the tax notice.

Attach the tax notice PDF to an email or print and send it via mail.
To mark the tax notice as Sent, click Mark as and select Sent.
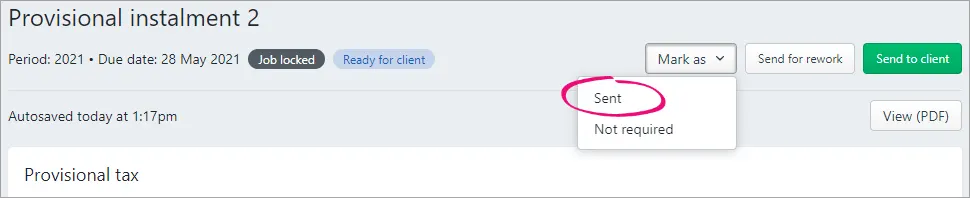
The status of the tax notice updates to Sent.
The Mark as options only change the status in Practice Compliance. For example, if you choose Mark as > Sent, the tax notice won't be sent to the client. To send the tax notice, you need to select the Send to client button next to Mark as.


When your client pays the provisional tax amount or terminal tax amount, and the payment is reconciled in Data reconciliation, the status of the tax notice automatically updates to Paid. You can also mark the tax notice as paid manually.
From within the tax notice, click Mark as and select Paid.