Digital signatures let your clients approve documents online with one click.
When a client is set up with a portal, you can choose Signature required. This creates a task that your client can approve to digitally sign, and you’ll get notified so you know that the return is ready to lodge.
You may encounter approval with digital signatures in other areas of Practice Compliance too, like when working with Tax.
Practice Compliance – Send a document for digital signature approval
Make sure that you've created a portal for the client you're sending the document to.
Select the client from the side menu. Digital signatures aren't available if you're viewing all clients, so you need to select a single client before continuing.
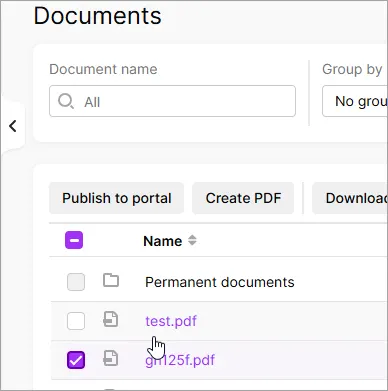
Click Documents in the top menu bar.
Select the documents you want to send for approval.
Click Publish to portal above the list of documents.
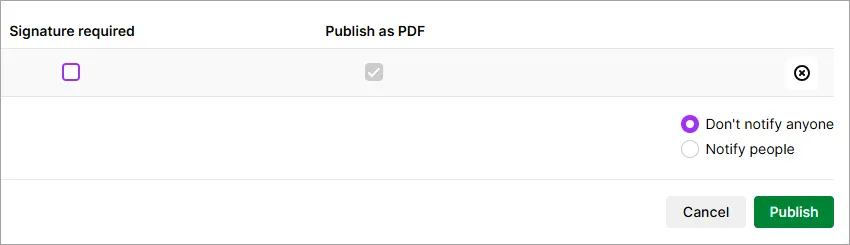
Select Signature required, choose whether you want to notify the client and click Publish.
Complete any details you'd like to add, like a task description, and click Publish and create task.


AE/AO – Send a document for digital signature approval
You can share documents with a client by publishing them to the client’s portal, straight from MYOB AE/AO. An approval task will be created for your client, so they can view, download, print and approve the documents from within their portal. For instance, you can send financial statements, invoices and tax returns. Watch this video to see how clients can approve documents in their portal.
If you’re sending documents that don’t need digital signature approval, see Sending documents from AE or AO by publishing to portal.
In MYOB AE/AO, select a document you want to publish to the client portal. If the file you want to publish:
was added to MYOB AE/AO Document Manager: You can publish a document from Document Manager if its status is Completed or Approved.
is in the client document folder in MYOB AE/AO: If you use AE/AO but don't have Document Manager, you can publish documents that are accessible from the Documents tab of the client record.
Click Publish to Portal.
If you’ve already created your client portal, the Publish to... page appears.
If you haven’t created a portal for your client, you’ll be prompted to either:create a portal for your client. You’ll be directed to the Create Portal page to create your client portals.
add the client to an existing portal. Select the relevant portal and click Add.
In the Publish to … Portal page, you can tag (classify) each document into an appropriate category. Tagging documents makes it easier for you to find them later.
Select the appropriate year that the document relates to from the drop-down.
You can reorder the document list if you want. Click in front of the document you wish to reorder and drag it to the position where you want it.
Click the Signature required checkbox for each document requiring digital approval, then click Next.
Select the portal users who need to digitally approve the documents. You can assign a contributor or full-access user.
If someone else usually deals with this client, you can choose to show them as the sender of the task. Click the x next to your name in the Send as section, and then click + Add sender to choose the name that should appear on the task and email notification.
Select who in your practice should be notified when the document gets digitally approved, or if a user or contributor asks questions or adds comments.
Give the task a title and description.
The title will be the subject of the email that is sent to the users. It will also be the task title displayed on your Tasks page and the Tasks page of your client.
The description will be the body of the email the users receive. Use this to give them more details about the task. The Description text box has a simple rich text editor to format the email message. For example, enter a new line of text, bold text and retain all the formatting.For some types of tasks, you can use a task template.
Enter or select the due date for the task to be completed. Enter a date in dd/mm/yyyy format or click the calendar icon to select a due date.
Click Publish and create task.
How to access the published documents
-
An email will be sent to each user you’ve published a document for, notifying them that you have shared documents with them that require approval.
-
An email will be sent to each user you’ve published a document for, notifying them that you have shared documents with them in the portal, and a task will be appear on their Tasks > Open page.
-
If you published more than one document, only one task will be created for them. Your clients can see all the related documents on the Tasks details page
-
Tracking document approval
If only one user has been assigned the task of approving documents, you’ll be notified by email when they have either approved or rejected the documents.
If more than one user needs to digitally approve the documents, you’ll be notified by email when all users have approved them, or if anyone rejects a document.
You can also track the status of each document approval (approved, rejected, pending) on the Signees section of the Tasks details page.
If there are several documents to be approved, then each document must be approved by all assigned users before the task is digitally signed. If one of the documents is rejected, then the whole task is rejected too. You’ll have to resend the amended documents for approval and this will create another task.
When documents have been approved by all users, you can mark the related tasks as complete. The tasks then move from the Tasks > Open page to the Tasks > Completed page in Practice Compliance.
The task’s history appears in the Activity and comments section of the Tasks details page of the particular task.
Troubleshooting digital signature issues
There are several reasons why a digital signature may fail to be applied successfully to a document. These include:
-
The document you sent to the client has already been digitally signed.
-
The document you sent is not a PDF.
-
The PDF file is encrypted or password protected.
-
The width of the PDF file's first page is too narrow to include a digital signature.
-
The file was deleted before it could be signed.
In these cases you will need to resubmit the documents for the client to sign.