Quotes provide your customers with a price that’s guaranteed for a specified period. For many businesses, they're a crucial part of the sales process, enabling you to turn prospects into paying customers.
This help topic shows how to create a quote in MYOB Business. When the customer accepts or declines the quote, you can update its status to reflect that. You can also turn a quote into an invoice with just one click.
Speed up entering quotes
You can create your customers, sales items, and payment details at the time you can create a quote, but if you set them up beforehand you just simply need to choose them each time. Here is some things you should consider setting up to make entering quotes faster:
1. Start the quote for a customer
Go to the Create menu and choose Quote.
Now select the Customer you're quoting for. If it's a new customer, click + Create customer then enter their details and click Save. Learn more about adding customers.

2. Set an expiry date to help close the sale
The Expiry date defines how long the quote is valid for. It can add a sense of urgency for the customer to take up the offer.

To set the expiry date, check or change the Issue date. Click the Expiry date, choose an option from the Quote expires list and enter the date you want the quote to expire:

Here are some other details you might want to check or change:
edit the number in the Quote number field. If you change the number, future quote (and invoice) numbers will increment from this new number.
You can set up separate numbering for your sales transactions, including quotes. Find out more
enter the Customer PO number (if the customer has one)
confirm the quote Status (Open, Accepted or Declined).
(If you're registered for GST) select if the amounts in the quote are Tax / GST inclusive (includes tax) or Tax / GST exclusive (excludes tax).
3. Enter what you're quoting
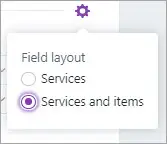
If the quote will contain items, click Field layout and choose the Services and items option.
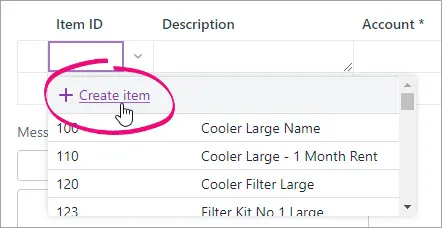
If you're adding items to the quote, select the item you're quoting for from the Item ID field and the number of Units of that item. If the item doesn't exist, add it by clicking + Create item, enter the item details, then click Save. Learn more about creating items.
The following details appear, based on what you entered when you created the item: Description, Category, Unit price and Tax code/GST code. The default quantity you're selling (No of units) is 1, but you can change this.
Use the built-in calculator
There's a built-in calculator in the No of units, Unit price, Discount and Amount fields. Just enter a calculation in the field and tab out of it:

If you're quoting for a service, enter a Description and complete the Category, Amount and Tax code / GST code details.
Removing a line
To remove a line from the quote, click the delete icon (x) to the right of the line.
(Optional)
Choose a Job if the line item relates to a specific job. Tell me more about jobs.
If you want to add a note about the quote, choose a Notes to customer and enter any additional notes in the box below it. These notes will appear on the customer's quote. For example, you could use this area to add additional details about payment. You can choose one of the default notes or add your own reusable notes — see Notes to customer.
Repeat from step 2 for each item or service you want to include on the quote.
Enter any charges for Freight, and if required, change the default Tax/GST code. If you can't enter Freight, you'll be prompted to specify a linked category for freight. (What is a linked category?)
The following totals are automatically calculated:
Subtotal—the total for the items added to the quote
Tax—the amount of tax applied to the quote
Total—the subtotal amount plus the tax amount


4. Send the quote
Use the buttons and menus across the top right of the page to choose how you want to save and send the quote.

If you want to:
Convert the quote to an invoice, click Convert to invoice (only available once you've saved the quote). The Invoice page appears, containing the items and/or services and prices from the quote. Make any required changes to the invoice, and click Save, or click Email invoice to send it to the customer.
For more information on entering invoices, see Creating invoices.Preview the quote, click Preview to open a preview of the quote in another browser tab. If you use AccountRight browser, you can also choose to preview the quote in one of AccountRight's PDF templates.
Email the quote, click Email quote, choose who to email it to, your subject and message and what quote template to use and click Send quote. See Email, SMS or print sales for more details.
Save it, click the Save button or choose one of the options from the Save dropdown:
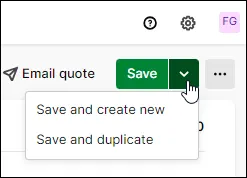
Save and create new. The quote is saved, and a new, blank quote appears.
Save and duplicate. If you want to create a similar quote, click this option to open a quote with the same details and a new quote number.
Activity history
When you create or send a quote, or convert the quote to an invoice, this is recorded in the Activity history section at the bottom of the quote.
Access sales settings, click the ellipsis (...) and choose Sales settings. Choose how your quotes, invoices, sales orders and statements look and how you communicate with your customers. Learn more about the options you can set in Sales settings.
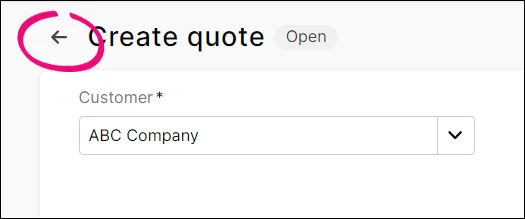
To cancel a quote, just hit the go back arrow and click Discard in the message that appears:

Accept or decline a quote, or turn it into an invoice
Depending on how the customer has responded to the quote, you an update its Status to show where it is in the sales process and whether you can proceed with the sale:

If the customer:
hasn't yet accepted or declined a quote, it will have a Status of Open.
wants to proceed with the sale, but you're not ready to invoice them (or you want to let others in the business know the sale is proceeding), change the quote's Status to Accepted.
doesn't want to proceed with the sale, change it to Declined.
When a customer is ready to buy what you've quoted, you can quickly turn a quote into an invoice. Just open the quote from the Sales menu > Quotes and click Convert to invoice:

This creates an invoice, with all the details prefilled from the quote. If you want, you can update its details (except the Customer). Then, send the invoice (need some details on sending an invoices?).
Find, change or delete a quote
You can find a quote by going to the Sales menu > Quotes.

Use the filters across the top to narrow your search.
Click Column options to show and hide what you don't need:
-
change the order of shown columns by dragging them up or down
-
hide columns by clicking the eye icon.

Any changes you save only appear for you, not for other users. They're also retained if you log out of MYOB Business and log back in again.
These options are available on the Invoices, Quotes and Sales orders pages.
Click the Quote number to open a quote and make your changes. If you need to delete the quote, click the ellipsis (...) and choose Delete quote.

FAQs
How do I change the default email message?
This is set in your sales settings. See Set up default emails.
(AccountRight browser users) Why has the default Freight tax code changed?
If you access an AccountRight company file in a browser, you might notice that the default Tax/GST code for the Freight field is different when you enter a quote in the browser.
This is because the default Tax/GST code in the browser is set in the linked income category for freight (Accounting menu > Manage linked categories > Sales > Income category for freight), whereas in the desktop app it's set in the customer's card (Card Information window > Selling Details > Freight Tax Code).
You can easily change the Tax/GST code in the transaction or set a new default Tax/GST code in the browser by editing the freight linked income category.
Can I reuse an expired quote?
Yes. If a quote is expired, (meaning that it's passed the Expiry date in the quote), you can update its Issue date and Expiry date and resend the quote.
Quotes provide your customers with a price that’s guaranteed for a specified period. For many businesses, they're a crucial part of the sales process, enabling you to turn prospects into paying customers.
This help topic shows how to create a quote in AccountRight, and how to turn a quote into an order or invoice.
Speed up entering quotes
You can create your customers, sales items, and payment details at the time you can create a quote, but if you set them up beforehand you just simply need to choose them each time. Here is some things you should consider setting up to make entering quotes faster:
1. Start the quote for a customer
Go to the Sales command centre and click Enter Sales.
For the Sales Type, choose Quote.
Choose the Customer you're quoting for.


2. Enter what you're quoting
Enter details of what you're quoting for. Here are some tips:
Display columns relevant to what you're quoting for (items or services) by clicking Layout.
Make your quote clearer by adding headings, subtotals and blank lines.
Let customers know when a quote expires by creating a reusable comment.

3. Send the quote
Click Send To if you'd like to email the quote or save it as a PDF.

Click Print and choose a form to print the quote. You can customise your forms to suit your needs.

If you only want to save the quote and send it later, click Save Quote.
Turn the quote into an order or invoice
If the customer accepts the quote, you can turn it into a sales order or invoice. When you do this, the quote is retained. But you can delete it if you want.
Delete quotes automatically
There's a preference to make this happen – go to the Setup menu > Preferences > Sales tab > Delete Quotes upon Changing to and Recording as an Order or Invoice.
Go to the Sales command centre and click Sales Register.
Click the Quotes tab and select the required quote.
If you want to change the quote to:
an order, click Change to Order
an invoice, click Change to Invoice.
Make any necessary changes, for example, change the transaction date to today. If you want to retain the quote number, there's a preference you can set for this (Setup menu > Preferences > Sales tab > Retain Original Invoice Number when...).
Click Record to create the new order or invoice. The original quote will remain in the Sales Register window unless you've set the preference to delete it automatically (see the note above).
If you no longer need a quote
If a customer declines a quote, or you simply don't need it anymore, you can delete it.
Go to the Sales command centre and click Sales Register.
Click the Quotes tab and select the required quote.
Go to the Edit menu and choose Delete Sale.

If you want to keep the quote, you might want to add a note to the Memo field as a record. Just open the quote, update the Memo field then click OK to save it.
