If you're familiar with general journals, here's how to add a new journal, or find one that's already been entered.
To add a journal entry
Go to the Accounting menu and choose Create general journal.
Enter the Date of the journal, or click the calendar icon to choose the date.
Select whether the journal will Display in GST report as a Purchase or Sale.
(Optional) Enter a Description of transaction to describe the transaction.
Confirm the Reference number is correct. If not, enter a new reference number.
Changing the numbering
If you change the reference number, you’ll change the automatic numbering. For example, if you change the number to 000081, the next time you create a journal entry the new reference number will be 000082.
(Optional) If the journal is an EOFY adjustment, select this option. When running reports you can include or exclude entries with this option selected.
In the Amounts are field, select either Tax inclusive or Tax exclusive.
Start entering a line item by selecting the appropriate Category from the list. If you'd like to add a new category, click the dropdown arrow for the Category field and choose Create category. Find out more about Adding, editing and deleting categories.
As appropriate, enter either a Debit amount or a Credit amount.
Do not enter negative amounts (e.g. -345.00).
(Optional) If there's a quantity associated with this line item, enter it in the Quantity column.
Add a short Description for the line item.
(Optional) Choose a Job if the line item relates to a specific job. Tell me more about jobs.
Select the appropriate Tax code from the list. The tax is calculated and displayed in the totals section.
Add further line items, repeating the steps from step 8 above.
To delete a row, click its delete (x) icon.
When you're done, make sure the Out of balance shows $0.00. If you see an amount in this field, make sure that for each credit, there’s an equal debit, and vice versa. The Out of Balance amount must be $0.00 before you can continue.
If you want, you can save this transaction as a recurring journal entry. This is ideal for journal entries you'll post regularly, like a monthly depreciation expense.
Click Save as recurring.
Enter the recurring transaction Schedule name.
Choose the Frequency, such as Daily, Weekly or Monthly.
Choose the date the recurring transaction will start.
Select how many times you want the transaction to recur.
Click Save.
For more information on recurring transactions, see Recurring transactions.
Click Record to save the journal entry, or if you need to create another journal entry, choose an option under Record and new:
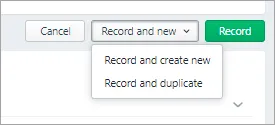

Click Record and create new to record the transaction and create a new one
Click Record and duplicate to record the transaction and create a new one with the same details (which you can then edit).
To find a journal entry
Go to the Accounting menu and choose General journals. The Find transactions page appears with the Transaction type set to show General journal.
Filter the list as required.
Enter a date range to find journals within that date range.
Choose a category to find journals containing that category.
Enter all or part of the journal's description or amount in the Search field.
Matching journals will be displayed.
To open a journal entry to see its details or make any changes, click the journal's Reference no.
To delete a journal entry
AccountRight browser users only
If you need to reverse a journal entry you can only do this if you're accessing an AccountRight company file. You'll need to do the reversal in your AccountRight desktop software. See the AccountRight help topic, Reversing a transaction.
Go to the Accounting menu and choose General journals. The Find transactions page appears with the Transaction type set to show General journal.
Filter the list as required.
Enter a date range to find journals within that date range.
Choose a category to find journals containing that category.
Enter all or part of the journal's description or amount in the Search field.
Matching journals will be displayed.
Click the journal's Reference no. to open it.
Click the Delete button and Delete again in the message that appears.
Printing journals
Run the Journals report then print the displayed report. See Business reports for details.
At the end of the financial year, your accountant might want you to record journal entries for things such as depreciation of your computer or company car. As these are likely to be just “book adjustments” (there’s no cash or other party involved), you would record them as general journal entries.
Need to change, delete or reverse a journal entry? See Changing or deleting a transaction.
General journal entries are different to other transactions in AccountRight. In the Record Journal Entry window (Accounts command centre > Record Journal Entry) you need to:
specify at least two accounts that require adjusting (this is called the "double entry" system of accounting)
enter at least one of the amounts as a “debit” and another as a “credit”
ensure that the total debit and credit amounts in the entry are equal.
Your accountant can help you work all this out, but if you need a quick refresher, here’s a guide to choosing whether an amount is entered as a debit or credit in the Record Journal Entry window:
For accounts of this type... | Record an increase as a... | Record a decrease as a... |
|---|---|---|
1-xxxx Asset | Debit | Credit |
2-xxxx Liability | Credit | Debit |
3-xxxx Equity | Credit | Debit |
4-xxxx Income | Credit | Debit |
5-xxxx Cost of Sales | Debit | Credit |
6-xxxx Expense | Debit | Credit |
For example, say you want to record depreciation expenses for your company car. The two accounts that are affected are:
Account | Account type | Increase or decrease? | Debit or credit? |
|---|---|---|---|
6-1140 Depreciation | Expense | Increase | Debit |
1-2320 MV - Accum Dep’n | Asset (but it has a negative balance) | Decrease (because it has a negative balance) | Credit |
Attaching documents to journal entries
You can attach documents to journal entries in AccountRight. This helps you meet record-keeping requirements and centralises storage, making documents easy to find – pull up documents without needing to go through filing cabinets. Attachments are part of the audit trail, increasing the accountability and transparency of your financial records.
Attachments in AccountRight are securely stored online in MYOB's secure servers.
Supported formats and size
• File types can be either PDF, TIFF, JPEG or PNG.
• Files must be less than 10MB in size.
Other ways to record adjustments
If you need to adjust the balance of banking accounts, inventory items, customers or suppliers, there’s a better way to record the adjustments. Here are some common adjustments you might need to make and suggestions for how to record them in AccountRight:
Bad debts | Record an adjustment for each customer using the Sales window (Sales command centre > Enter Sales). Enter negative dollar values in the sales to create credit notes that can be used to close the sales you won’t be receiving payment for. Tell me more |
|---|---|
Stock adjustments | If you’re tracking item quantities and values in AccountRight, go to the Inventory command centre > Inventory Adjustment to make any adjustments. Tell me more. If you’re not tracking inventory, you can record a general journal entry. |
Opening balances | Go to the Setup menu > Opening Balances to enter amounts for accounts and items you had on hand when first starting to use AccountRight. Tell me more |
Bank transfers | To record transfers between banking accounts or to petty cash, go to the Banking command centre > Transfer Money. Tell me more |
Owner drawings | To record withdrawals, or personal expenses, go to the Banking command centre > Spend Money. Tell me more |
Capital contributions | For cash contributions made by the owners of the business, go to the Banking command centre > Receive Money. Tell me more. For other types of assets, such as a car or furniture, record a general journal entry. |
To record a general journal entry
Open the Record Journal Entry window (Accounts command centre > Record Journal Entry).
Enter the date of the entry. Most end-of-financial-year adjustments are recorded as at 30 June for Australia, or 31 March for New Zealand.
Journals for last financial year
If you've closed your financial year but need to record a journal entry for that year, you can roll back the financial year to record that transaction. Once you've recorded the transaction, make sure you close the financial year again.
Enter a Memo describing the journal entry, for example “Depreciation for the 201x financial year".
Select if the entry is Tax Inclusive.
The General Journal No. field shows the next available number for your journal entries. If you click this field, Auto # appears to confirm that the number has been automatically selected for you. You can type a different number into the field if you want, but this will not change the numbering for subsequent general journals.
Select if the entry is a Year-End Adjustment. Learn more about entering end-of-year adjustments.
Selecting this option means you’ll be able to filter it out of reports such as your Profit & Loss Statement when you display the report (to do this, select Exclude Year-End Adjustments from the Display Transactions filter when viewing the report).
If you want to attach a document to the journal entry, click Attachments and drag files or browse and add files into the General Journal Attachments area. More about attaching documents to transactions.
In the Acct No. field, select one of the accounts you want to adjust.
Enter the amount you want to adjust in the appropriate column— Debit or Credit (see the table above as a reference).
If the entry relates to a job, enter the job number.
If you want to record a comment about the account you’ve selected, enter it in the Memo column.
If the entry affects your BAS (GST) return, select the appropriate tax GST code. Otherwise, leave the Tax (GST) column blank, or select the N-T Not Reportable code.
On the next row, select another account that you want to adjust and then complete the relevant details for each column.
If the entry involves more than two accounts, continue to add rows for each account. Press the TAB key on your keyboard to move to a new row.If you selected codes in the Tax (GST) column other than N-T, select whether the adjustment relates to sales or purchases:

Click Record.

Here's an example journal entry:
Need to change, delete or reverse a journal entry? See Changing or deleting a transaction.
FAQs
Can I record a journal entry to fix a transaction recorded using the wrong account or tax/GST code?
The easiest way to fix the transaction is to reverse or delete it, then record it again using the correct details.
Alternatively, you can record a journal entry to fix it. Because each transaction is different, exact steps are hard to provide. You might need the help of an accounting advisor to help work out the particulars of your journal entry.
Here's a typical example for correcting a transaction posted to the wrong account:
On the first line of the journal entry, debit the account used in the original transaction and apply the original tax/GST code.
On the second line, credit the correct account and apply the original tax/GST code.
Ensure the amounts on each line are the same so the transaction balances.
Here's a typical example for correcting a transaction posted with the wrong tax/GST code:
On the first line of the journal entry, debit the account used in the original transaction and apply the original tax/GST code.
On the second line, credit the original account and apply the correct tax/GST code.
Ensure the amounts on each line are the same so the transaction balances.
Can I set up a recurring general journal template?
Yes! This means you won't need to create a general journal entry from scratch each time you need to record it. When you set up a recurring transaction, the transaction information is saved in a separate "holding area" where you can retrieve the transaction as many times as you want. You can change the information on a recurring template as needed. Until you record them, recurring general journal templates have no effect on your financial records.
You can remove a recurring template whether your transactions are changeable or unchangeable. The transaction is removed from your list of recurring templates only. Any transactions you've already recorded using a recurring template won't be affected if you choose to remove that recurring template.
How can I print my journal entries?
While you can't print individual journal entries, you can run the General Journal report for a given date range, then print the report. The General Journal report is found under Reports menu > Index to Reports > Accounts tab > Transaction Journals sub-heading.
Note that this report will always sort journals by date (oldest journals first), regardless of any other Sort criteria you apply.
What does Auto # mean in the General Journal No. field?
The default number shown in the General Journal No. field is the next available number. When you click in the General Journal No. field, Auto # appears to confirm that the number has been automatically selected for you. You can type a different number into the field if you want, but this will not change the numbering for subsequent general journals.