You can invite others to access your MYOB business, like your work colleagues. If you need a hand with your books from an advisor, you can also invite your accountant or bookkeeper.
All users can work in your MYOB business at the same time, and there's no limit to how many users you can add.
Who you can invite depends on your user type
Your user type controls what MYOB business files you can access and who you can invite. For example, an Owner can invite others, but a File User can't. This keeps your business data safe.

Inviting a user
Sign in to your MYOB business.
Click the settings menu (⚙️) and choose Users and permissions to display a list of all users.
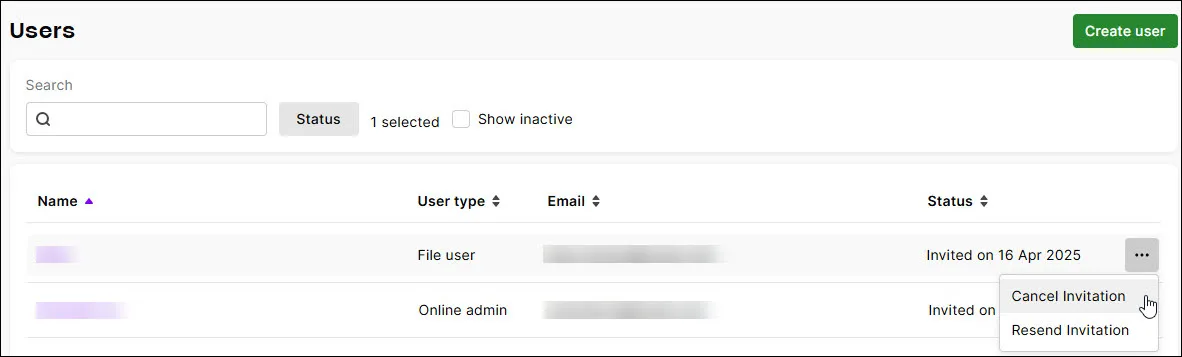
Click Create user to open the Create user page.
Enter the user’s Name and Email.
In the Access section:
Select the roles and permissions you want to give the user. For example, select Sales if they'll work with customer invoices. More about access levels
Choose the User type – this determines which businesses the user can access, and whether they can invite other users:
File user – can only access the current business and can't invite other users
Online admin — can only access the current business and can also invite other users
Click Save and send invitation. The user is added to the list on the Users page with the status of Invited. Invitations expire after 10 days.
For all File User user types, an email is sent to the user giving them the option to:
accept the invitation by creating a new user login,
accept the invitation by using an existing user login, or
decline the invitation.
Online admin user types don't receive this email and don't need to accept an invitation to access a file.
Check the status of a user
The Status column of the Users page shows at what stage a user is in the invitation process (like when they were invited and whether they accepted the invitation) and whether they're an active or inactive user (that is, whether they can access the MYOB file).

You can filter the Status column by clicking the Status button and choosing options.
Need to change a user's details or remove them? See Edit and delete users.
Cancelling an invitation
You might want to cancel an invitation because it was sent to the wrong person or email address, you've assigned the wrong access level or access is no longer needed.
To cancel an invitation
Click Status and choose an option to narrow your search and declutter the Users page:

Click the ellipsis (...) for the user and choose Cancel Invitation:

The user's status becomes Cancelled invitation with the date of the cancellation. The invitation link stops working — if the invitee clicks the original email link, they see an error message and cannot use it to access the file. A cancellation notification is emailed to Online admin and Advisor invitees.
Resending an invitation
You can resend an invitation:
to someone you've invited but who hasn't accepted the invitation. You might do this to remind them that they've been invited to the file.
to a user whose invitation has the status Cancelled, Expired, or Access removed. If they accept the invitation, they become an active user again.
To resend an invitation
Click Status and choose options to narrow your search:

Click the ellipsis for the user and choose Resend Invitation:
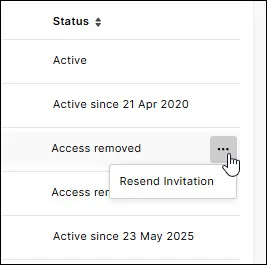
When you resend an invitation to so someone who's been invited but hasn't accepted the invitation yet, a new invitation with a fresh accept invitation link is sent to them (the old link will no longer work).For users with the status of Cancelled, Expired, or Access removed, select the user's user type. This determines whether the user can access the current business (File user) or other businesses with the same serial number (Online admin). You can change the user's previous user type if you want (for example, from File user to Online admin, or vice versa).

Advisors can’t change a user’s type when resending an invitation.
Click Resend invitation.


FAQs
Can I change an active user's User Type?
You can only change an active user's user type if you have the Owner user type. See Edit and delete users.
How do I change the Owner user?
The current owner user can change the owner user.
If the owner user is no longer available (for example, they've left the business or are deceased), you'll need to submit a support request to set up a new owner user.
Does an invitation expire?
Invitations expire after 10 days, after which it'll have a status of Expired on the Users page, along with the date it expired. You can resend an expired invitation by clicking the ellipsis (...) and choosing an option.
If a user tries to accept an expired invitation, they'll receive a message directing them to contact the person who invited them.
This topic is for files that are online using the latest AccountRight version. If your company file isn't online, see Add a user to an offline file.
You need to set up and invite anyone you'd like to access your online company file. Sharing access is included in your AccountRight subscription, so the users you invite won't need their own subscription to access your file.
You can invite as many users as you like including people who work for your business, such as sales staff and payroll officers, and people who work outside your business, such as your accountant, bookkeeper, and financial advisor.
When you invite a user, they're sent an email with details on how to access your company file. They'll also be able to work on your file using a web browser.
More about accepting an invitation
You can set up two types of access:
Online file user—a file user can access any of the online company files they've accepted an invitation to use. This is the level of access you'd grant most of your users, who just need to work with the one file.
Online administrator—an online administrator can work with all company files that are listed under the owner’s software serial number. In addition to this, an online administrator can:
purchase additional online files
invite other users to access an online company file
To invite a new user
You must be the company file administrator, or a user assigned the Administrator role, to create other users. If you don't sign on as an administrator, the User Access option won't appear in the Setup menu.
Signed on as an Administrator but still can't see the User Access option? Contact us for help.
Open your online company file.
Go to the Setup menu and choose User Access.
Click New User.
Select the option Create an online MYOB login for this user. This option allows them to open the file by entering their MYOB account details (email address and password). They will also be able to work on your file using a web browser. Can't see this option? Your company file must be online to see these options. If your company file isn't online, see Add a user to an offline file.
Set up company file sign-on detailsType the user’s name in the User name field.
Enter their email address in the Email field. This is where the user's invitation will be sent, and the email address they'll use to sign in to your online company file. If they don't already have an MYOB account, they'll set one up when they accept your invitation.
If you want this user to be able to invite other users, select the option Invite user to be an online administrator. More about online administrators
Select user rolesIn the Company file roles list, select the roles you want to assign to the user. For example, select the Sales role if the user will work with customer invoices. If you want, you can customise roles to suit your business needs. You can disallow access to any feature and even set some as read-only. There's a lot that you can control, so it's worth taking a quick look through the default roles and changing them, if necessary.
Click Save and Invite User. An email is sent to the user's email address inviting them to access your online company file. Invitations expire after 10 days – see the FAQs below about cancelling or resending invitations.
To add an advisor or accountant
Online company files only
You create user accounts for your colleagues who need to access your company file, but your accountant might want to be set up as an advisor. This will allow multiple people in their practice to access your file without requiring user accounts for each person.
This doesn't mean anyone in their practice can access your company file information – only people who have been invited to access your online file can access it, and the domain name of their MYOB account email address must match that of the advisor's.
Advisors can only be added to online company files. Also, you must be the company file administrator, or a user assigned the Administrator role, to create advisors. If you don't sign on as an administrator, the User Access option won't appear in the Setup menu.
Open the online company file.
Go to the Setup menu and choose User Access.
Click New Advisor. This button will only appear if you're in an online company file.
Select the option Create an online MYOB login for this user. This option allows them to open the file by entering their MYOB account details (email address and password). They will also be able to work on your file using a web browser. Can't see this option? Your company file must be online to see these options.
Set up company file sign-on details
Type the advisor’s name in the User name field.
Enter the advisor's email address in the Email field. This must be the email address that they use to log into their MYOB account. Note that the email address must have 35 characters or less.
For security reasons, your file can only be accessed by employees in your advisor's business who have an MYOB account email login with a domain name that matches the advisor's. For example, if the advisor's email address is joe@mypractice.com, only employees in your advisor's business who log into their MYOB account with a "mypractice.com" email address can access your file. They also must have been invited to access your file.
If you want to give the advisor online administrator access, select the Invite user to be an online administrator option. More about online administrators
Select user rolesIn the Roles list, select the roles you want to assign to this advisor. For example, you might assign the Accountant/Bookkeeper role.
Click Save and Invite User. An email is sent to the advisor's email address inviting them to access your online company file. Invitations expire after 10 days – see the FAQs below about cancelling or resending invitations.
Cancelling an invitation
You might want to cancel an invitation because it was sent to the wrong person or email address, you've assigned the wrong access level or access is no longer needed.
Cancelling invitations is done from the Users page in the web browser version of AccountRight. You must be an Online admin or Owner to cancel invitations.
To cancel an invitation
Open a web browser and sign into your company file at app.myob.com
Click the settings menu (⚙️) and choose Users and permissions.
Click Status and choose an option to narrow your search and declutter the Users page:

Click the ellipsis (...) for the user and choose Cancel Invitation.
The user's status becomes Cancelled invitation with the date of the cancellation. The invitation link stops working — if the invitee clicks the original email link, they see an error message and cannot use it to access the file. A cancellation notification is emailed to Online admin and Advisor invitees.
Resending an invitation
You can resend an invitation:
to someone you've invited but who hasn't accepted the invitation. You might do this to remind them that they've been invited to the file.
to a user whose invitation has the status Cancelled, Expired, or Access removed. If they accept the invitation, they become an active user again.
Resending invitations is done from the Users page in the web browser version of AccountRight. You must be an Online admin or Owner to resend invitations.
To resend an invitation
Open a web browser and sign into your company file at app.myob.com
Click the settings menu (⚙️) and choose Users and permissions.
Click the ellipsis (...) for the user and choose Resend Invitation:
When you resend an invitation to so someone who's been invited but hasn't accepted the invitation yet, a new invitation with a fresh accept invitation link is sent to them (the old link will no longer work).
When you resend an invitation to a user with the status of Cancelled, Expired, or Access removed, select the user's user type. This determines whether the user can access the current business (File user) or other businesses with the same serial number (Online admin). You can change the user's previous user type if you want (for example, from File user to Online admin, or vice versa).
Advisors can’t change a user’s type when resending an invitation.
Click Resend invitation.
FAQs
What does a user's invitation email look like?
Here's an example of what a user sees when you invite them to access your company file:

Why can't I click User Access in the Setup menu?
You must be the company file administrator, or a user assigned the Administrator role, to use the User Access option in the Setup menu. If you still can't see the User Access option, contact us and we'll help you out.
Does an invitation expire?
Invitations expire after 10 days, after which it'll have a status of Expired on the Users page, along with the date it expired. You can resend an expired invitation by clicking the ellipsis (...) and choosing an option.
If a user tries to accept an expired invitation, they'll receive a message directing them to contact the person who invited them.