Billings forms part of the Processing functions in GreatSoft Practice Management (PM) and is split into five entry types, i.e. Fees, Open Item Fees, Invoices, Interest and Reversals.
This Processing: Billings: Capturing Billings Process Guide covers the three Billing Types, Invoices, Fees and Open Item Fees. This guideline aims at enabling you to create and capture new Billings Batches, consisting of single or multiple Billing items, and to submit them for Approval by your assigned Approver.
Because the capturing processes of Invoices, Fees and Open Item Fees are very similar, the majority of principles will be demonstrated by creating an Invoice. Any differences wrt Fees and Open Item Fees will be specifically outlined. Most of these principles apply to Interest and Reversals also, and should these guidelines adequately equip you to capture those types of entries.
Fees versus Invoices
Process Fees to clear WIP and raise Invoices to Clients to reduce the WIP ledger balance, while the Debtor ledger balance will automatically increase.
The Debtors ledger stores information of the Invoices/Fees raised and the monies collected from clients.
A balance on the Debtors ledger indicates the amount owing by the client to the firm.
Statements are sent out regularly and Debtor’s Aged Analysis Reports are monitored to assist with the collection of cash from clients who have outstanding balances for unpaid invoices/fees (with eDocs).
Accessing the Billings page
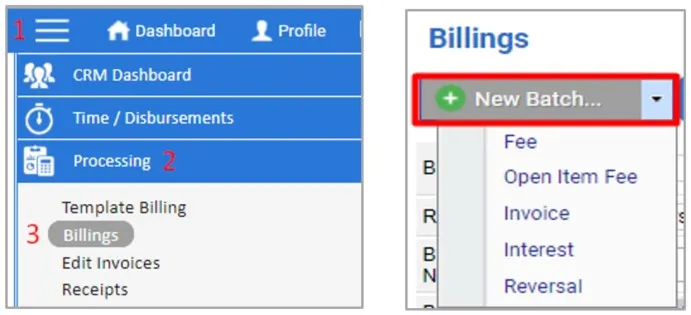
Navigate to PM Processing functions from any location in PM, by clicking on the PM Dashboard Menu access button.
Click on the Processing Menu section to display the available options.
Click on the Billings Menu option to launch the Billings page.
Billings landing page with default filter options and grid in which the filtered Billing Batches are listed.
The default Billings grid view show all Billing Types on one page.
You can filter to only view a specific Billing Type.


Creating a New Billings Batch
Important, the Billing Date cannot be before the start date of the current open PM Period.
To initiate the creation of any New Billings Batch, click on the New Batch shortcut.
You can click anywhere on the button to display the lookup.
Select the desired Billing Type from the lookup, for illustration purposes, an Invoice.

Capturing an Invoice as example of a Billing Type Batch
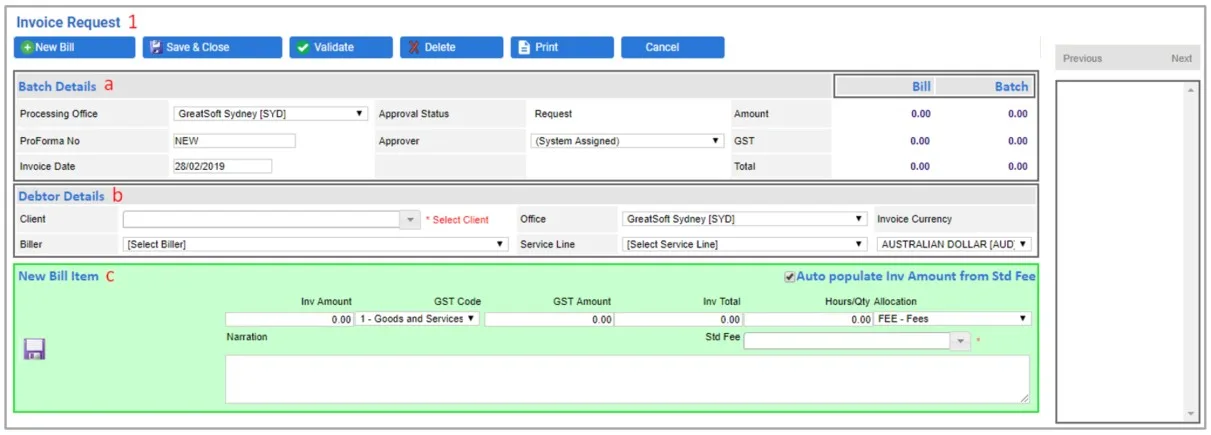
An Invoice page is called an Invoice Request (similarly, Fee Request, etc).
Capture the Invoice from top to bottom, from a practical point of view, since some information impacts downwards:
Batch Details
The default or changed Processing Office may pull through to the Billing Office in Debtors Details (System Option dependent).
Debtor Details
The default Billing Office can be changed to differ from the Processing Office in Batch Details.
The selected Billing Office impact on the available Clients in the Client lookup on the Debtor Details section.
The selected Billing Office and Client together impact on and update the remaining fields within the Debtor Details section.
New Bill Item
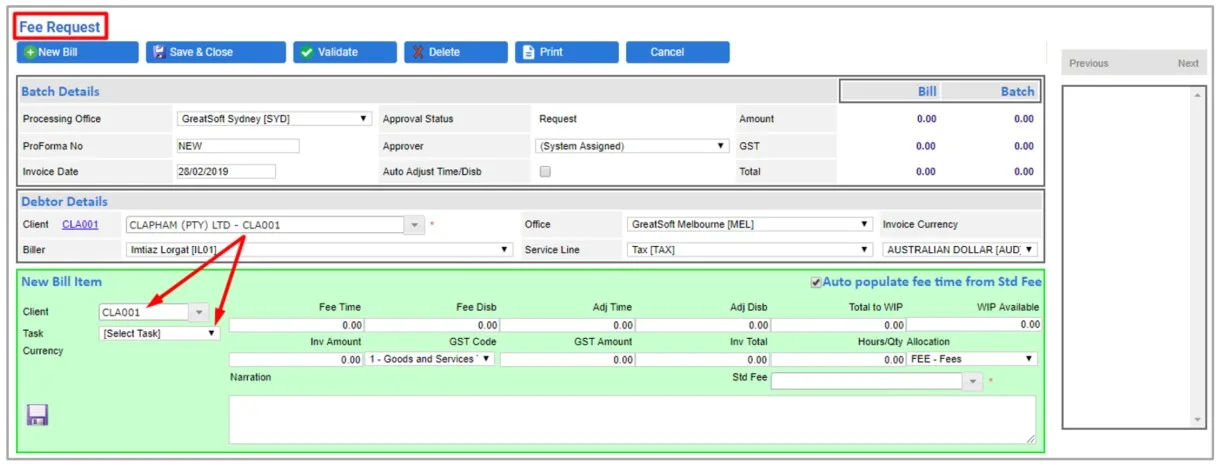
The selected Client in the Debtor Details section impact on the relevant fields on the New Bill items section of some Billing Types, like a Fee, such as the Client and available Tasks.
The selected Client on the Debtor Details section of a Fee, for example, changes the Client and hence available Tasks on the New Bill Item section accordingly.


Capturing batch details
Complete the applicable fields on the primary Batch Details section of the Invoice Request.
Processing Office
Keep the default Processing Office, or select another from the lookup.
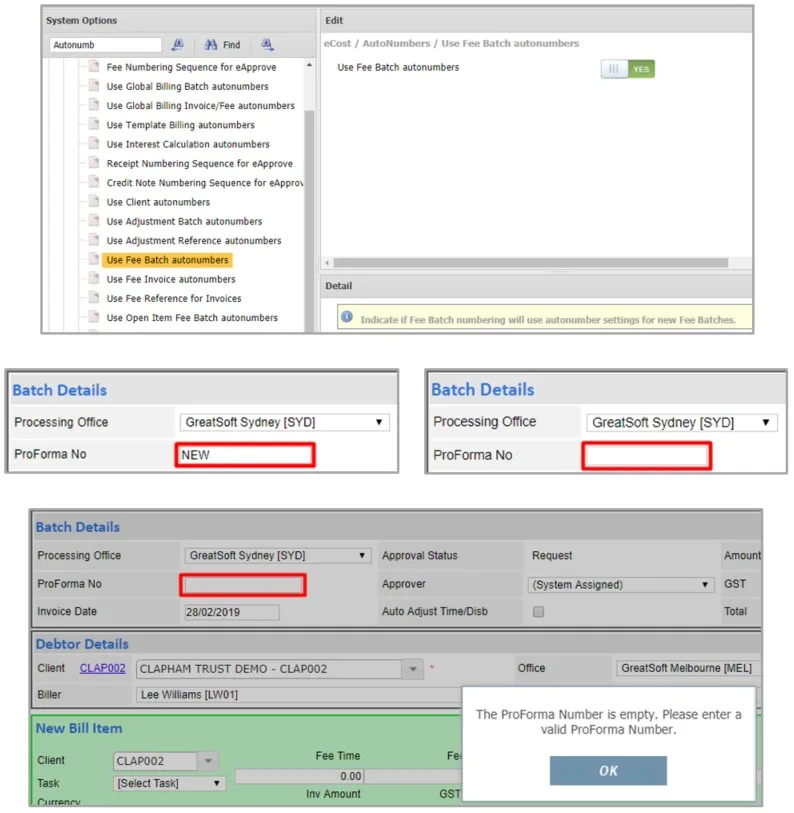
ProForma No
Depending on your firms setting, it will either display the word “NEW”, meaning that AutoNumbers are defined (the number will automatically populate upon Save & Close). If the field is empty, you must capture the number manually. You will be prompted to capture it upon saving, if you have missed the field (System Option dependant).
Approver
Leave as the default System Assigned, or select a designated Approver from the lookup.
Only employees, set up as Approvers for the current user who creates the invoice, are available in the lookup (System Option dependant).
Bill | Batch
Leave these values to automatically populate as an entry(s) is Saved for this Invoice.
These fields will accumulate muliple saved entries’ amounts.
Invoice Date
Change the Date as applicable.
It Defaults to the last day of the currently open System period (System Option dependant).

Capturing Debtor Details
Complete the applicable fields on the secondary Debtor Details section of the Invoice Request.
Client
Select the Client receiving the Bill.
Terminated Clients will not reflect on the Client list.
Office
Select the Office, Biller and Service Line who generate the Invoice request.
Invoice Currency
Default Currency as per the selected Billing Office.
Capturing the New Bill Item(s)
The green New Bill Item section represents “Edit Mode” for capturing a new transaction (and for editing an existing later).
Inv Amount
Enter the Invoice Amount and tab to the next field or click on the next.
Alternatively, depending on your firm’s settings, the amount will automatically populate when a Standard Fee is selected.
VAT Code
Keep the default VAT code, or change it if necessary.
VAT Amount
The VAT Amount automatically populates.
Inv Total
The Invoice Total automatically populates.
Hours/Qty
Enter the number of Hours or Quantity of Billing units.
Allocation
Select the Allocation from the lookup.
Std Fee
Select the applicable Standard Fee from the lookup, if applicable.
Depending on your firm’s settings, when you select a Std Fee, it will automatically populate the values in the above Inv Amount, VAT Code, VAT Amount and Inv Total accordingly.
Narration
When the Standard Fee is selected, the Narration field will automatically update. Keep the narration and/or edit it.
Save button
Save the completed individual entry.
Upon saving, the entry will be added at the end of the page and be shaded in blue.
The green New Bill Item will again be available for capturing another new entry(s) in the current Invoice, as necessary.
An Invoice may hence have a single or multiple entries.
Edit button
Select this button to Edit an individual entry and Save the changes made.
Delete button
Select this button to Delete an individual entry and complete the correct entry in the available New Bill Item section. Save the changes made as above.
New Bill button
Select this shortcut to create a new Invoice in the existing Invoice Batch to have a multiple Invoice Batch.
An Invoice Batch may hence have a single or multiple Invoices.
Save & Close
Click on this button to Save the Invoice as a whole (containing a single entry, or multiple entries) in order to update the Bill to the system.
You will be returned to the Billings grid, where the New Invoice Batch will be listed after you Save and Close the Invoice.
If you don’t Save and Close the Invoice, all entries captured will be lost and will the new Batch not reflect in the Billings grid.
Cancel button
Select this button to exit the current Bill without saving the changes made, and to return to the main Billings grid.
Empty Invoice Request
An Invoice Request before having made any changes to the form.

Invoice Request with captured Entry ready to Save
Note the following changes after the first entry is captured:
Bill | Batch
These values will only update after saving the first and subsequent entries.
Office
After having selected the Billing Office, the Biller and Service Line fields populated automatically but can be changed.
Invoice Currency
The Currency changed in accordance with the selected Billing Office.
Auto populate
Auto populate Invoice Amount from Std Fee:
When enabled, when selecting a Standard Fee, the Narration and Invoice Amount are automatically updated.
If disabled, the Std Fee will only automatically update the Narration field.

Saved Invoice Request with a single Saved Entry
Note the following changes after the first entry is Saved:
Processing Office
The Processing Office cannot be changed.
ProForma No
The ProForma Number automatically populated from the “NEW” status and cannot be changed.
Bill | Batch
These values automatically populated and agree with the entry’s amounts. For multiple entries in the Invoice, the values will aggregate all amounts.
Client
The Client receiving the Bill cannot be changed.
Office
The Billing Office cannot be changed.]
Invoice Currency
The Currency cannot be changed.
New Bill Item
The green New Bill Item section is available to capture the next entry if the Invoice should have multiple entries.
Saved Entry
The Saved Entry is added to the end of the page and is shaded in blue.

Saved Invoice Request with multiple Entries
Note the following changes after the second entry is Saved:
Bill | Batch
These values automatically populated and represent the aggregate of the two saved entries.
New Bill Item
The green New Bill Item section is again available to capture a next entry, if applicable.
Saved Entry
The Saved 2nd Entry is added to the end of the page and is shaded in blue.

Updated Billings grid after the Invoice is Saved and Closed
Save & Close the Invoice to return to the updated Billings page.
The new Invoice Batch shows in the grid.
It currently is the only Billing item for the selected current PM Period.
The Bills column indicates that the Batch only contains a single (1) Invoice.
To Edit the existing Invoice Batch, click on the BatchNumber hyperlink.
You can either Edit the existing Invoice in the Batch, or
Tou can add another Invoice to the current Batch.

Add a New Invoice to the existing Batch
Initiate the Editing of the existing Invoice by clicking on its BatchNumber hyperlink.
Create a second Invoice in the existing Batch by clicking on the New Bill shortcut.
The existing Invoice in the Batch opens from where you must create the New Bill to launch the next Invoice in the current Invoice Batch.
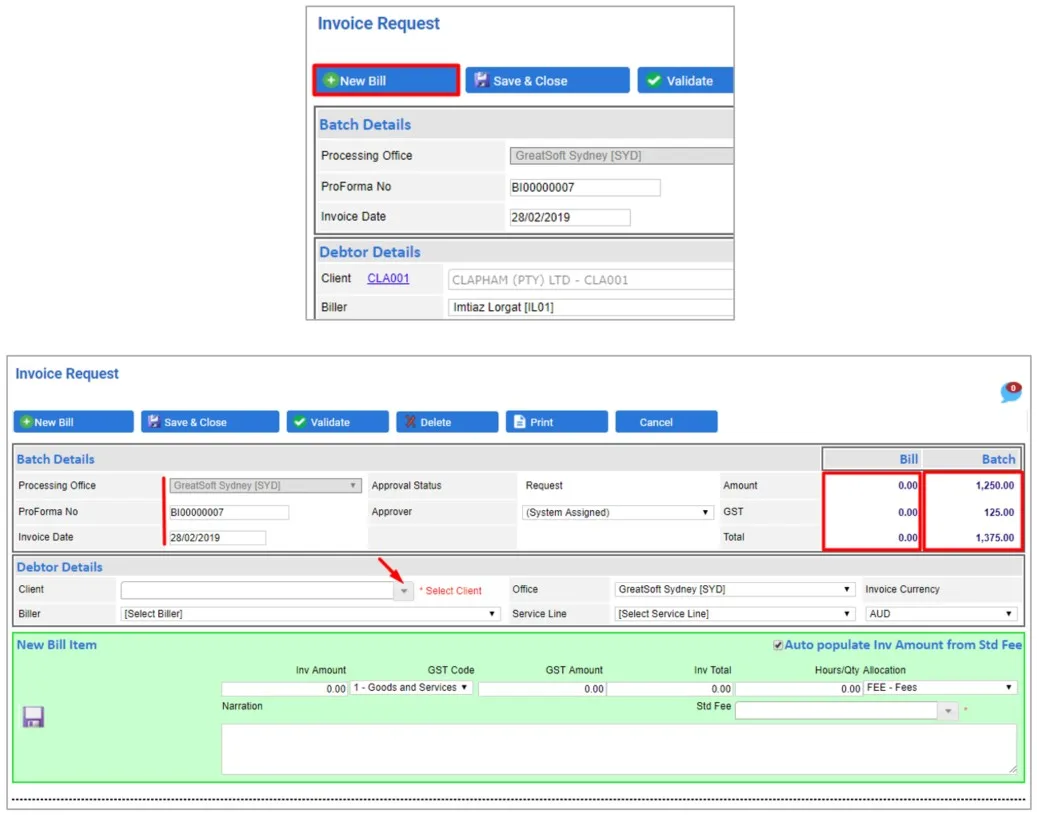
The Batch Details section of the new Invoice remains as per the existing Batch.
Use the above guidelines to capture the new Invoice:
Complete the Debtor Details section.
Capture and Save the entry(s) in the new Invoice in the green New Bill Item section.
The Navigation pane activates as soon as a batch has multiple entries.
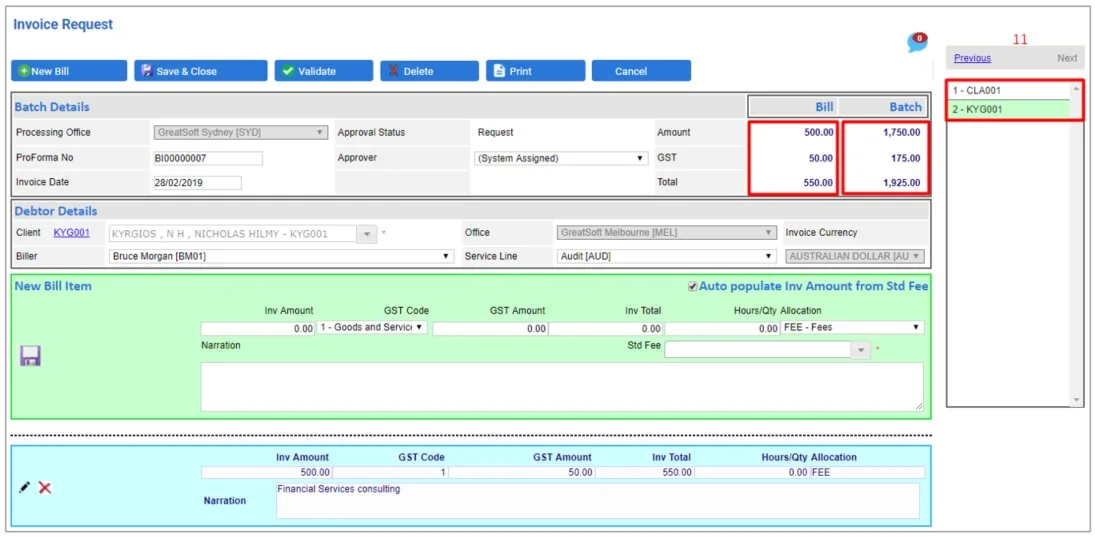
Save & Close to update the Batch in the system and to return to the Billings page.


Updated Billings grid after the second Invoice is Saved and Closed
Save & Close the second Invoice to return to the updated Billings page.
The Invoice Batch has updated in the grid.
The Bills column now indicates that the Batch contains multiple (2) Invoices.
To Edit the existing Invoice Batch, click on the BatchNumber hyperlink.
With the multiple Billings Batch, an interim List of Bills in Batch grid opens from where you can:
Either select the specific Invoice in the Batch you wish to Edit by clicking on its InvNumber hyperlink, or
Add a third new Invoice to the current Batch by clicking on the New Bill shortcut that is also available on this page, as on an open Invoice page.
To return to the main Billings page from the List of Bills in Batch grid, click on the Go Back button.

Interim List of Bills in Batch grid when open a Bills Batch with multiple Bills

Submitting a Billings Batch for Approval
On the main Billings page, select the checkbox to the left of the Billings Batch you wish to Submit for Approval by your designated Approver.
Confirm submission by clicking on Yes.
The Batch disappears from the grid as it now shows under the designated Approvers page.

Related Process Guides
Processing: Billings Overview: This Process Guide aims at providing you with an overall understanding of the Billings Processing pages and functions, and at enabling you to navigate to the desired Batches and/or specific Billing items for viewing and editing.
Processing: Settings: This Process Guide provides information about various settings that will affect the way in which Processing capture can be managed.
Processing: Approvals: This Process Guide aims at enabling designated Approvers to Review, Edit, and Approve or Reject submitted Billings and any Processing Batch.