If you use MYOB AE/AO, your family groups will be visible under the client's name in MYOB Practice Compliance. This is view-only access and any changes need to be made in AE/AO. Learn more about Family groups in AE/AO.
Groups can be used to consolidate together related clients and contacts. Groups are a label that you add to the contacts and clients who are associated with each other. By adding contacts to a group, you can access their information quickly without having to search every time.
Groups may consist of individuals, companies, trusts and other organisations. For example, you could create the group for:
Retail stores for Sunny Clothing Pty Ltd, Little Bird Bakery Ltd and Phones 4 U Ltd.
Smith Group for Mrs. Smith, Mr. Smith, Smiths Chip company, Smith Superannuation and the Smith Family Trust.
Farming clients for Three little pigs Ltd, Mary's Lambs Ltd and Jack and Jill's Crop Partnership.
Create a group
Go to Clients > Clients list.
On the right side, from the Create drop-down, select Group.
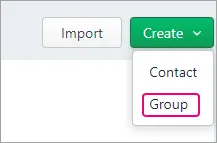
In the Create group window, enter the Group name and Group members.
Click Create.
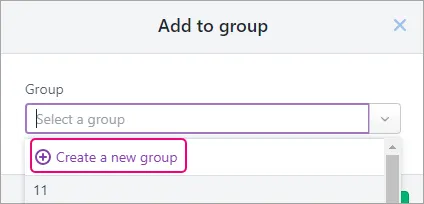
You can also create a group when adding a contact to a group in Add to group window.


View a group
Known issue – information panel doesn't open for clients and contacts when you sort with Group by
You won't be able to view more details for a client on the same page as the Contacts list when you click the Group by drop-down, select Group and select a client. You’ll need to click on the client’s name and go into the client workspace to view their details.
Go to Clients > Client list:
To view the list of groups, in the Group by drop-down, select Group.
To search for a group, enter the group name in the Search field.
Viewing groups for all clients
When you select All clients on the left panel, you can see the contacts consolidated by their group names. If a contact doesn't belong to a group, they will show under No Group.
To view the contacts under the group, click the down arrow before the group name:

Viewing groups for one client
To view the group a client or contact belongs to, select All clients, go to Clients > Client list and click a client row in the list anywhere other than the name link. The groups will be visible below the client's name on the right in the panel on the right of the page.

From the client details section, you can
add a client or contact to a group by selecting +Add to group
edit a group name or delete a group by clicking the group's name.
Edit or delete a group
Go to Clients > Client list and select Group in the Group by drop-down.
Select the name of the group you want to edit or delete.
In the Group details window, select whether you want to edit or delete, and make your changes.
Restricted clients
If you have restricted clients or contacts as part of a group, you'll see this message when you open the group: "There are restricted contacts in this group that are only visible to users with full access to that contact."
The restricted client will not appear in the list.
In the example below, there are 3 clients in the group, including a restricted client. You can see the names of all clients except the restricted client:
