INTRODUCTION
Bank Manager forms part of the Processing functions in MYOB Practice Management (MYOB PM).
Bank Manager gives the user the ability to import Bank Statements and to reconcile transactions with their outstanding/unpaid Invoices in MYOB PM.
GETTING STARTED
ACCESSING THE BANK MANAGER DASHBOARD
From any page across the system, where the Menu bar offers access to all of the PM application menu’s,
hover over the Processing menu item and select Bank Manager from the displayed lookup to launch the page.
Alternatively, where the Dashboard link is the only available option on the Menu bar, first click on the link to open the PM Dashboard, from where you can then access Bank Manager via the Processing menu.
Examples where the Menu bar only offers a link to the Dashboard include new applications that have been added to the software recently, such as the WIP Management - Recurring Billing – and Bank Manager dashboards.

Illustration of an empty Bank Manager landing page before any default Bank is set up:
CREATING A BANK
IMPORTANT:
Each Bank is allocated to an Office in MYOB PM
However, additional Offices can subsequently be allocated to a Bank
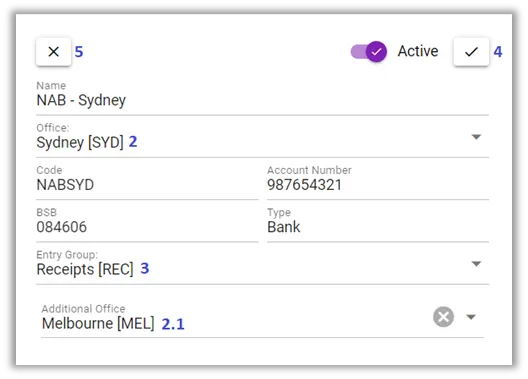
To initiate the creation of a new Bank record, click on the blue plus (+) button, located at the lower right-hand corner of the screen (1).
Select the desired Office (2) and populate the relevant Bank details.
(2.1) Additional Offices can be allocated to the same Bank.
This applies to firms that have more than one legal entity in MYOB PM, and where those legal entities share the same Bank. The result is that Invoices across all selected offices will be available for reconciliation of the relevant Bank Statement transactions.
Select the main Receipt Entry Group (3).
To Save the Bank record, click on the Save button (4).
Conversely, to discard the new Bank record (or any changes made to an existing Bank, click on the Delete (×) button (5).

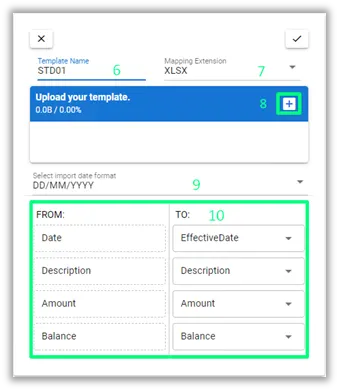
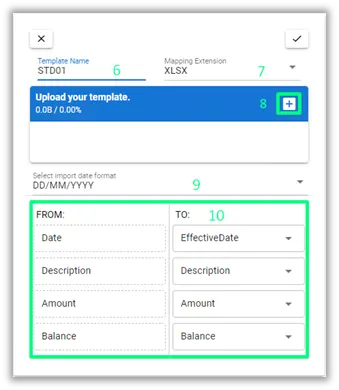
Capture a Template Name (6) for the saved Bank.
Select a Mapping Extention (7), which can either be XLSX or CSV.
Either upload a Bank Statement by clicking on the plus (+) button (8), or use the Bank Manager Template.xlsx to generate Bank Statements in Excel for uploading into Bank Manager.
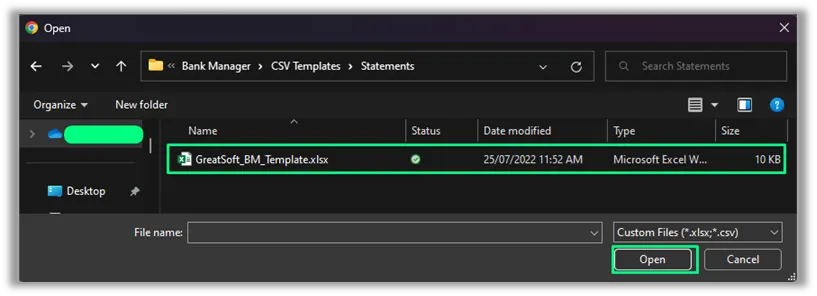
To upload a Bank Statement, browse for and select the file on your PC:
NOTE:
GreatSoft’s Bank Manager currently only supports Excel (XLSX) and CSV file types.
For CSV files, the Description, Amount and Balance must have the “General” formatting. Hence, the currency must not be set for the Amount and Balance fields on any import file type source.
Opened CSV file formats will depend on each PC’s specific Regional Setttings.
Example of CSV file with GreatSoft Standard Regional settings.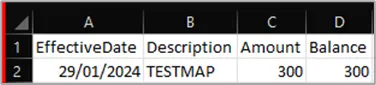
Example of CSV file with Microsoft default Regional settings.
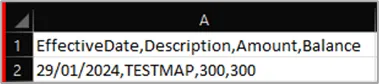
Click on the Mapping Extension field and select the relevant file type in order for the system’s column headings (FROM) to be matched to the relevant Bank Statement file type’s descriptions (TO) (10).
Map the columns of the Imported file (TO) to the available columns in MYOB PM (FROM) (10), by selecting each FROM column’s matching description from the lookup lists to the right:


RECONCILING BANK TRANSACTIONS TO INVOICES
TRANSACTION STATUS DEFINITIONS
Bank Manager automatically matches Bank Statement transactions to Unpaid Invoices, based upon the Amounts , Descriptions and References
The following transaction Statuses apply to Bank Manager:
Matched: Bank Manager has automatically matched the transaction (Total Amount) from the Bank Statement to an Invoice(s).
Review: Bank Manager has automatically matched the transaction, but requires user intervention.
Partially Matched: Bank Manager has automatically matched the transaction from the Bank Statement to an Invoice(s) but was unable to match the full transaction Total.
Unmatched: Bank Manager was unable to match the transaction to any Invoice.
Posted: The matched transaction has been posted as a Receipt
Archived: A user can Archive a Bank transaction where the transaction does not apply, but where the user wishes to keep the transaction for history purposes.
N/A: A transaction displays as N/A if the Client has no existing Invoices. If the transaction Amount is allocated to such a Client, it will post as an Unallocated Receipt
The Bank Reconciliation dashboard will display once the Template Mapping is saved
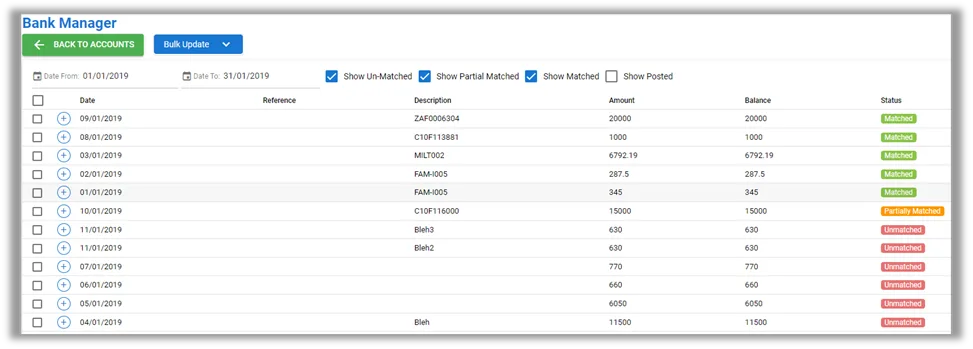
Period Dates (a): Dates default to the currently open system Period. Click on the Date fields to change
them on the displayed Date pickers
Statuses to display in the transaction grid (b):
Include or Only Show Un-matched
Include or Only Show Partially Matched
Include or Only Show
Include or Only Show Matched
Include or Only Show Posted
Include or Only Show Archived

Expand transaction (c):
When a transaction’s Status is Matched, the matched Client and Invoice(s) show:
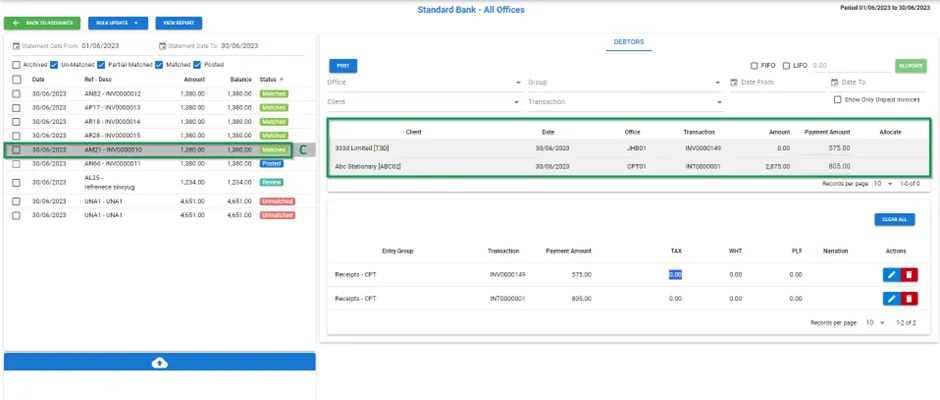
When the Status is Partially Matched and the transaction (d) is expanded, the Partially Matched Invoice(s) shows, together with the remaining balance (e) that requires allocation, either to an
existing Invoice(s) of that Client, or to an Unallocated Receipt
When the Status is Unmatched, Bank Manager could not find any Invoice that matches the transaction criteria. User intervention is required by having to manually allocate the transaction to an Invoice(s), or to an Unallocated Receipt


ALLOCATION OF UNMATCHED TRANSACTIONS
Expand the applicable unmatched transaction.
Office Filter (1): Display the desired Office’s unpaid Invoices.

Group Filter (2) : Display all Clients within the selected Group’s unpaid Invoices.

Client Filter (3): Display all selected Clients’ unpaid Invoices.
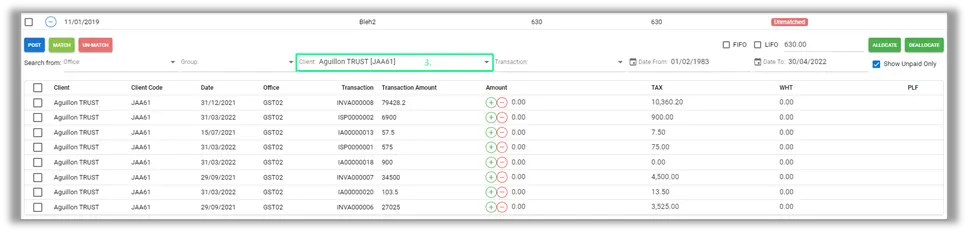
Transaction Filter (4): Display a specific Invoice:

Show unpaid only (5): Only display unpaid Invoices

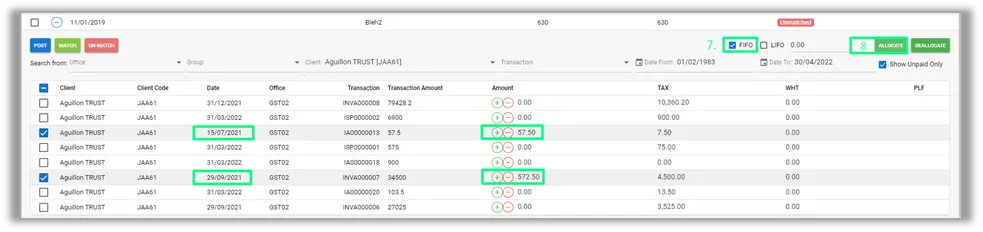
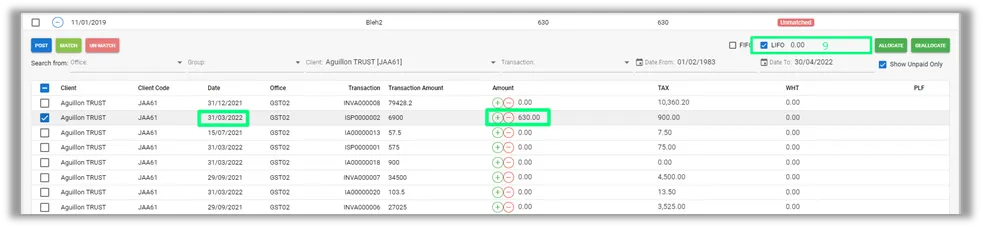
The FIFO | LIFO (6): Select Invoices to which a transaction Amount must be allocated:
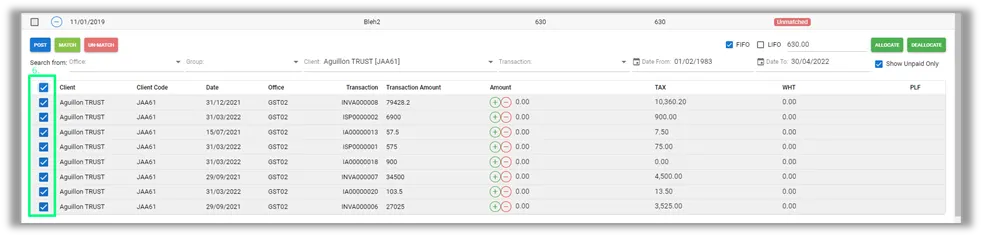
FIFO (7): The transaction Amount is allocated (8), starting from the first to last selected Invoice(s), as applicable.
LIFO (9): The transaction Amount is allocated (8) starting from the last to the first selected Invoice(s), as applicable.
Alternatively, type (10) the transaction Amount, or use the green plus button (11) to allocate the full transaction Amount to the selected Invoice(s).

Once the full transaction Amount has been allocated (12), click the Match button. The transaction can be
posted (14) once it has the Matched Status (13).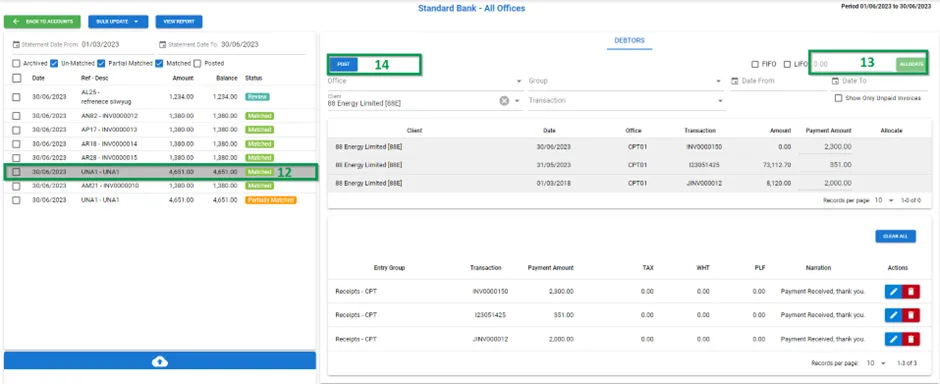
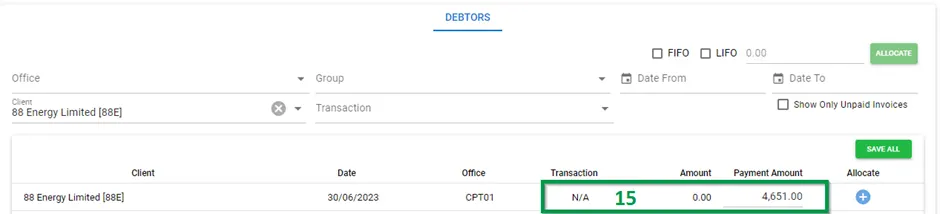
A transaction displays as N/A (15) if a transaction Amount can be allocated to a Client that has no existing Invoice(s). Such transaction will post as an Unallocated Receipt
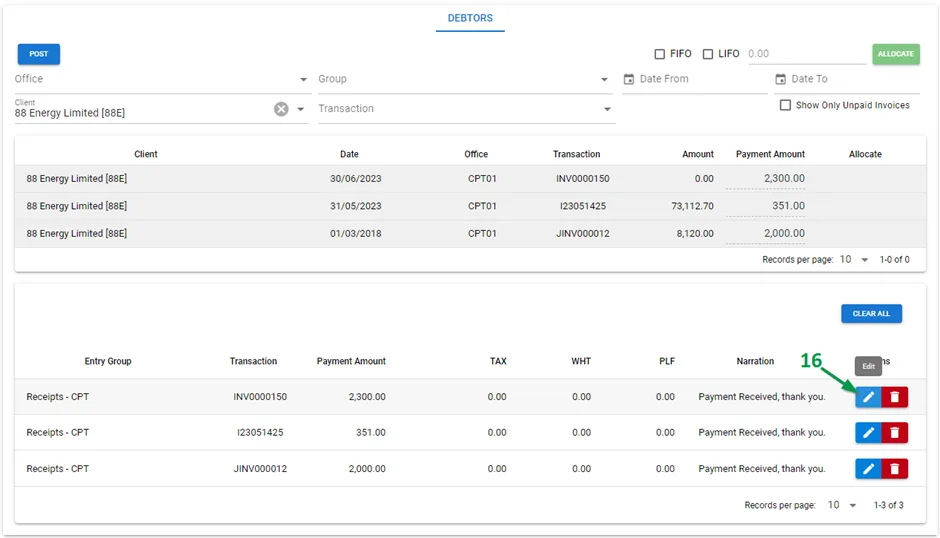
Line item Narrations can be captured on the transaction by clicking on Edit (16) and then on the activated
Narration textbox (17).The Set button (18) will set the Narration for the particular transaction. Once the desired narration has been set, press the Save button (19).


BULK ACTIONS
Post: Once all applicable transactions have been matched, select the Show Matched (1) filter, flag all (2) Matched transactions and Post (3).
Posting in Bank Manager posts directly to eCost
Note: Bank Manager does not require any Approvals.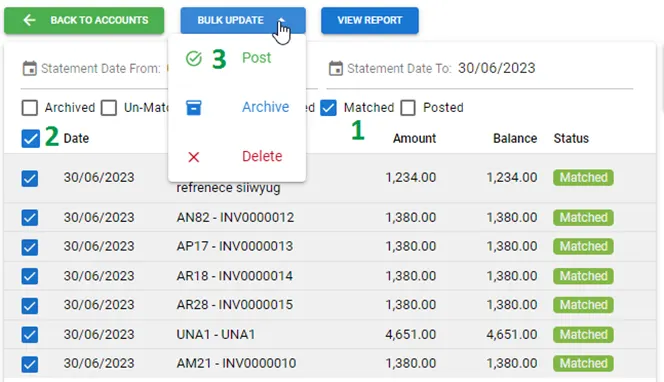
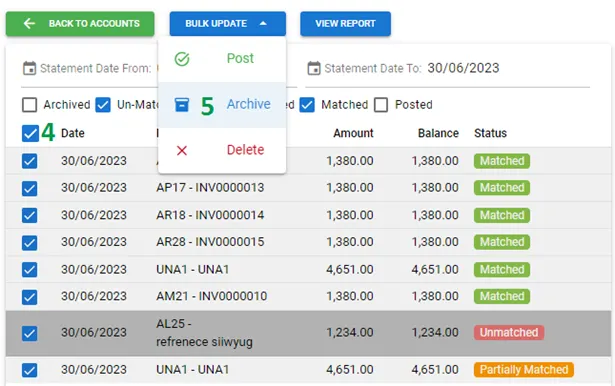
Archive: Flag (4) any transactions in a Statement that are questionable. Such unconfirmed transactions can be updated to Archived (5) for later matching:
Transactions with an Archived Status can be matched afterwards
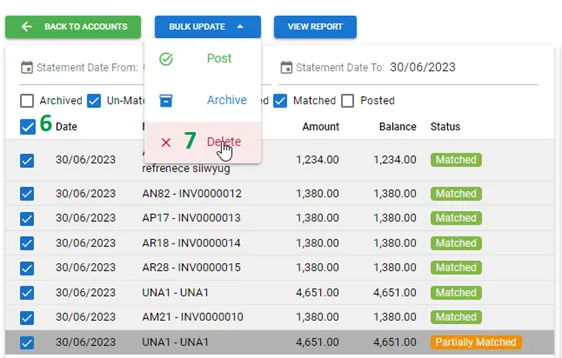
Delete: If redundant transactions from a Bank Statement require deletion, flag the individual items (6) and select Delete (7):


ADDITIONAL OPTIONS IN BANK MANAGER
Secure views can be applied to Bank Manager for firms who use this requirement. This will then limit the transactions that are visible to the logged in user, based on the Secure Office settings.
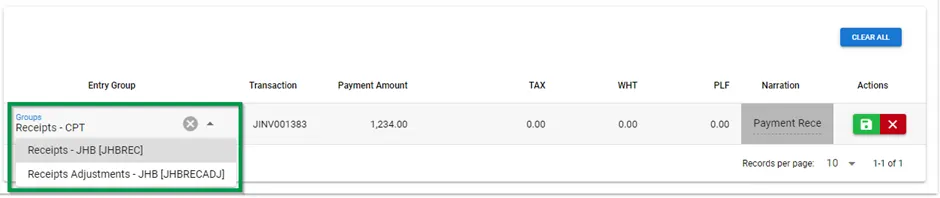
Firms who use Receipt Entry Groups per Receipt line item and the System Option eCost / GL_Integration / Receipt Entry Group Source is enabled, have the option to change the Receipt Entry Group when matching transactions.

SUMMARY OF TOPICS COVERED AND YOUR ACQUIRED SKILLS
The above guidelines should have enabled you to:
Create a new Bank:
Map the columns of the various exported Bank Statement file types to MYOB PM.
Use the MYOB PM Template
Save Mappings.
Upload exported Bank Statements or Bank Statements pulled into the MYOB PM Template.
Match/Allocate transactions by:
Allocating transactions using FIFO and LIFO
Manually allocating transactions.
Allocating transactions as unallocated transactions.
Perform bulk processes:
Post transactions.
Archive transactions.
Terminate transactions.