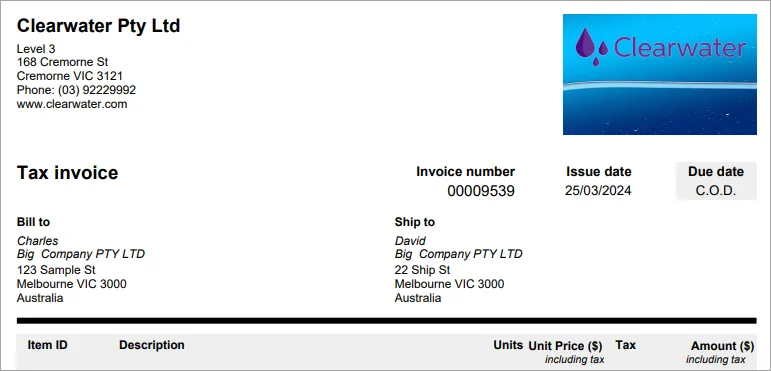
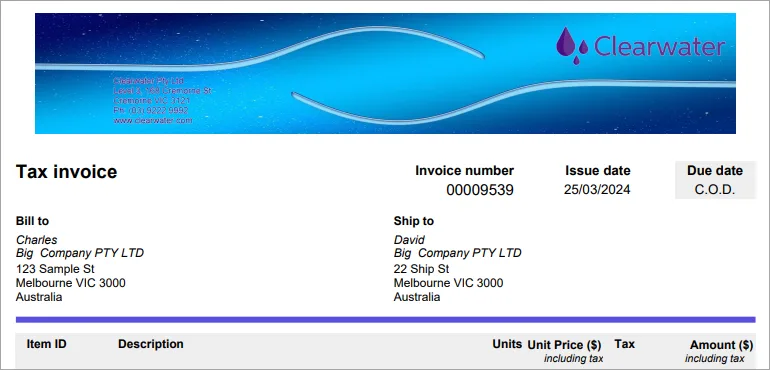
Adding a business logo or full width header image to your sales templates lets you communicate your brand and business details on your invoices, quotes and statements. You can upload up to 4 logos and header images so you can use different images in different templates.
Add a brand logo
You can add a logo that appears on all of your business forms, not just sales transactions, but also supplier bills, reports and employee pay slips.
Use a logo or full width image
A business logo is a small image of your logo that sits in the top right or left corner of your PDFs. Your business details, like the business name and address, will display in the opposite corner. Using a logo in a sales template provides subtle branding and gives you the flexibility to easily update your business details. You can upload up to 4 business logo images and choose the one to use in a template.

A full width header image is a banner at the top of your PDFs and provides a stronger visual impact. The image needs to contain all the business details you want to show at the top of your invoices, quotes and statements. The ideal image dimensions are 3000 pixels x 514 pixels. You can upload up to 4 full width header images and choose the one to use in a template.

Using payroll? Find out how to add a logo to your pay slips.
Uploading and managing images
To ensure images are best reproduced on your sales PDFs, it’s recommended that any image file you upload is:
a BMP, TIFF, JPEG or PNG file, and
less than 2MB in size.
To upload your business logo
Click the settings menu (⚙️) and choose Sales settings.
Click the Templates tab.
Click to open the template you want to add your logo to.
In the left panel, click the Design tab.
Choose the Logo source:
Use brand logo. If you haven't added a brand logo, click Upload a business logo (find out more about uploading a brand logo).
Choose a different logo:
For the Logo type, select Logo and business details.
Click Upload logo.
Find the image file, click it then click Open. After the image has uploaded, you'll see what it'll look like in the preview panel.
Select if you want to logo Right aligned or Left aligned.
If you want to upload more logos (maximum 4):
Repeat the steps to upload another logo.
Click the logo you want to use for this template. A purple tick appears on the logo image to show it's the one you've chosen and you'll see what it'll look like in the preview panel.
Click Save.
To change an uploaded logo
Click the settings menu (⚙️) and choose Sales settings.
Click the Templates tab.
Click to open the template you want to change the logo for.
In the left panel, click the Design tab.
Choose the Logo source:
Use brand logo. If you haven't added a brand logo, click Upload a business logo (find out more about uploading a brand logo).
Choose a different logo:
For the Logo type, select Logo and business details.
Change the logo.
If you've uploaded multiple logos (maximum 4), click the one you want to show on your invoices, quotes and statements. A purple tick appears on the logo image to show it's the one you've chosen and you'll see what it'll look like in the preview panel.
To upload a new logo (maximum 4), click Upload logo and choose the new logo image. If you've already uploaded 4 logos, you'll need to delete one to upload another (click a logo then click Delete).
Choose whether you want your chosen logo to be Right aligned or Left aligned.
Click Save. The new logo will now appear when you use this template.
To remove your business logo
Click the settings menu (⚙️) and choose Sales settings.
Click the Templates tab.
Click to open the template you want to remove the logo from.
In the left panel, click the Design tab.
If the Logo source is set to Use brand logo, find out how to remove or update your logo.
If the Logo source is set to Choose a different logo, for the Logo type, select Logo and business details.
To permanently remove (delete) a logo, click it then click Delete.
If you've uploaded multiple logos:
To prevent any of the logos appearing on your invoices, quotes and statements using this template, delete each of the uploaded logos (click the logo image then click Delete).
Choose one of your other uploaded logos (or click Upload logo to upload a new image) to have it display on your invoices, quotes and statements using this template. A purple tick appears on the logo image to show it's the one you've chosen and you'll see what it'll look like in the preview panel.
Click Save.
To upload a full width header image
Click the settings menu (⚙️) and choose Sales settings.
Click the Templates tab.
Click to open the template you want to add a full width image to.
In the left panel, click to open the Design tab.
Choose the Logo source:
Use brand logo. If you haven't added a brand logo, click Upload a business logo (find out more about uploading a brand logo).
Choose a different logo if you'd like your full width header image to only appear on your sales.
For the Logo type, select the option Full width header image.
Click Upload image.
Find the image file, click it then click Open. After the image has uploaded, you'll see what it'll look like in the preview panel.
If you want to upload more full width images (maximum 4):
Repeat the steps to upload another image.
Click the image you want to use for this template. A purple tick appears on the image to show it's the one you've chosen and you'll see what it'll look like in the preview panel.
Click Save.
To change an uploaded full width header image
If you've uploaded more than one full width image, you can choose the one you want to use for each sales template, or you can upload a new image.
Click the settings menu (⚙️) and choose Sales settings.
Click the Templates tab.
Click to open the template you want to change the full width image for.
Click the Design tab.
If the Logo source is set to Use brand logo, find out how to remove or update your logo.
If the Logo source is set to Choose a different logo, for the Logo type, select the option Full width header image.
Change the image.
If you've uploaded multiple full width images (maximum 4), click to choose the one you want to use for this template. A purple tick appears on the image to show it's the one you've chosen.
To upload a new full width image (maximum 4), click Upload image and choose the new image. If you've already uploaded 4 images, you'll need to delete one to upload another (click an image then click Delete).
Click Save. The new header image will now appear when you use this template.
To remove a full width header image
Click the settings menu (⚙️) and choose Sales settings.
Click the Templates tab.
Click to open the template you want to remove the logo from.
In the left panel, click the Design tab.
If the Logo source is set to Use brand logo, find out how to remove or update your logo.
If the Logo source is set to Choose a different logo, for the Logo type, select Full width header image.
To permanently remove (delete) an image, click it then click Delete.
If you've uploaded multiple full width images:
To prevent any of the images appearing across the top of your invoices, quotes and statements using this template, delete each of the uploaded images (click the image then click Delete).
Choose one of your other uploaded images (or click Upload image to upload a new one) to use it for this template. A purple tick appears on the image to show it's the one you've chosen.
Click Save.