If you charge a fuel levy, for example to cover fluctuating fuel costs, you can add it to your invoices as a separate line. This keeps the levy visible to customers and lets you track the income for reporting.
How you set up the levy depends on your business
There’s two options for adding a fuel levy to your invoices, depending on how you want it to appear on their invoices.
Option 1: Set up the fuel levy as an item that you can add to your invoices – this lets you charge the levy at a set amount or on a per‑unit rate, like a per‑kilometre basis.
Option 2: Add the fuel levy as a service line on the invoice (no item required) – this is best if you calculate the levy differently each time, for example as a percentage of the invoice total or a percentage of your freight charge.
If you’re not sure which option is best for you, check with your accounting advisor.
Option 1: Set up the fuel levy as an item
Use this option if you want a reusable item that you can quickly add to your invoices if your fuel levy is a set amount or charged on a per‑unit rate.
Create the fuel levy item
Create a new item (Create > Item).
Enter a clear Name, like Fuel levy (or similar).
Enter an Item ID.
(Optional) Enter a short Description that explains the charge. If you want customers to see this description on their invoices, select the option Use item description on sales and purchases.
In the Selling details section:
Select the option I sell this item:
Set the Selling price.
If you charge the same fuel levy amount on each invoice, enter the amount here.
If you charge the fuel levy on a per-unit basis, like per KM, enter the per KM price here. Also enter the Unit of measure, e.g. KM.
If you prefer to enter the fuel levy amount on each invoice, leave it at $0.00.
Choose if the fuel levy price is Tax inclusive or Tax exclusive based on advice from your accountant or advisor.
Choose the Income category for tracking sales you want to use to track fuel levy income. If needed you can create an income category for this purpose.
Choose the Tax/GST code based on advice from your accountant or advisor.
Click Save.
Add the fuel levy item to an invoice
Create an invoice (Create > Invoice) or open an existing unpaid invoice.
Choose the Customer and add the products or services you’re invoicing for.
On a new line, in the Item column, choose your Fuel levy item.
Enter or confirm the fuel levy amount.
If the levy is a set amount, confirm or enter the Amount.
If the levy is charged on a per-unit basis, like per KM (and you set up the item this way), enter the No of units. The Amount will calculate automatically.
Finalise and send the invoice as normal.
Here’s our example of a per-kilometre fuel levy added as the last line item on an invoice:

Option 2: Add the fuel levy as a service line
If you don’t want to set up an item, or if you calculate the levy differently each time, for example as a percentage of the invoice total or freight, just add a free‑text service line on the invoice.
Create an invoice (Create > Invoice) or open an existing unpaid invoice.
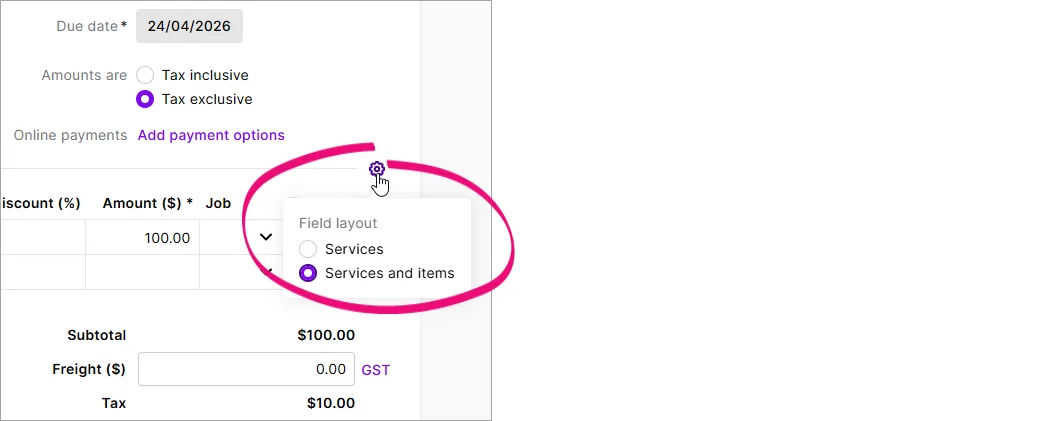
Click the Field layout cog (⚙️) and select Services and items.
Add your usual products or services based on what you’re invoicing for.
On a new, empty line:
In the Description column, type something like Fuel levy (or similar).
In the Category column, choose the income category you want to use for fuel levy income. If needed you can create an income category for this purpose.
In the Amount column, enter the fuel levy amount you want to charge on this invoice, for example a percentage of the invoice or freight total.
Check the Tax/GST code is correct.
Review the Subtotal, Tax/GST and Total at the bottom of the invoice.
Click Save or Save and send.

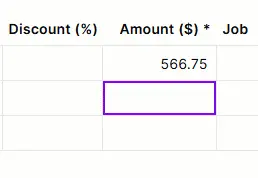
Use the built-in calculator to work out percentages
In the Amount field, just type the amount/100*percentage rate and hit enter. This example shows how to work out 3%.
Making a fuel levy invoice template
If you apply a fuel levy to lots of invoices, you can create a recurring invoice. This is like an invoice template that contains all the details you need, including the fuel levy, so you don’t need to add those details each time you create an invoice. More about recurring transactions.
Create an invoice and add the fuel levy as described above or open an existing invoice which contains the fuel levy.
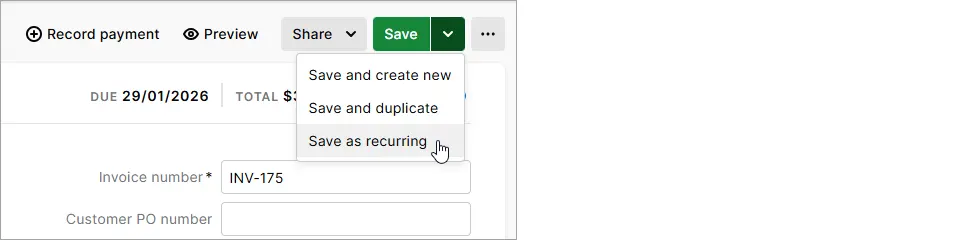
Click the dropdown arrow next to the Save button and choose Save as recurring.
Enter a Schedule name. This is the name for the recurring invoice template, like Fuel Levy Invoice or similar.
For the Frequency, choose Never. More about scheduling recurring transactions.
Click Save.

To use the template to create an invoice
Create a new invoice (Create > Invoice).
Click Prefill from recurring.
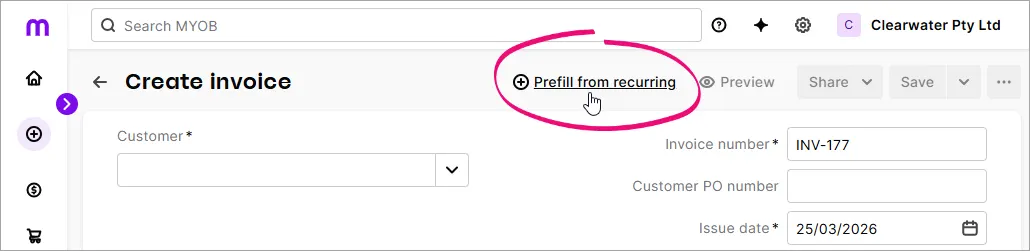
Select the invoice template you created and click Prefill. The invoice is populated with all the details from the template – including the fuel levy.
Make any required changes and save or send the invoice as normal.

Keeping your fuel levy up to date
Fuel prices change, so review your levy regularly to make sure:
the amount is still appropriate
the description is clear and accurate for customers
the Tax/GST code still reflects current tax advice.
To update a fuel levy item
Go to Products and services and open your Fuel levy item.
Update the Description, Unit price or Tax/GST code as needed.
Click Save.
Changes you make to the item apply to new invoices going forward. Existing invoices and historical reports don’t change.
For service lines, just update the description or amount directly on each invoice as you go.
If you charge a fuel levy, for example to cover fluctuating fuel costs, you can add it to your invoices as a separate line. This keeps the levy visible to customers and lets you track the income for reporting.
How you set up the levy depends on your business
There’s two options for adding a fuel levy to your invoices, depending on how you want it to appear on their invoices.
Option 1: Set up the fuel levy as an item that you can add to your invoices – this lets you charge the levy at a set amount or on a per‑unit rate, like a per‑kilometre basis.
Option 2: Add the fuel levy as a service line on the invoice (no item required) – this is best if you calculate the levy differently each time, for example as a percentage of the invoice total or a percentage of your freight charge.
If you’re not sure which option is best for you, check with your accounting advisor.
Option 1: Set up the fuel levy as an item
Use this option if you want a reusable item that you can quickly add to your invoices if your fuel levy is a set amount or charged on a per‑unit rate.
Create the fuel levy item
Create a new item (Inventory command centre > Items List > New).
Enter an Item Number.
Enter a clear Name, like Fuel levy (or similar).
Select the option I Sell This Item.
Choose the Income Account for Tracking Sales that you want to use to track fuel levy income. If needed you can create an income account for this purpose.
Click the Selling Details tab:
Set the Base Selling Price.
If you charge the same fuel levy amount on each invoice, enter the amount here.
If you charge the fuel levy on a per-unit basis, like per KM, enter the per KM price here. Also enter the Selling Unit of Measure, e.g. KM.
If you prefer to enter the fuel levy amount on each invoice, leave it at $0.00.
Choose the Tax/GST Code When Sold based on advice from your accountant or advisor.
If the fuel levy price does is tax inclusive, select the option Prices are Tax Inclusive (based on advice from your accountant or advisor).
Click OK.
Add the fuel levy item to an invoice
Create an invoice (Sales command centre > Enter Sales) or open an existing unpaid item layout invoice.
If it's a new invoice, click Layout, choose Item then click OK.
Choose the Customer and add the products or services you’re invoicing for.
On a new line, in the Item Number column, choose your Fuel levy item.
Enter or confirm the fuel levy amount.
If the levy is a set price, confirm or enter it in the Price field.
If the levy is charged on a per-unit basis, like per KM (and you set up the item this way), enter the number of units in the Ship field. The Total will calculate automatically.
Finalise and send the invoice as normal.
Here’s our example of a per-kilometre fuel levy added as the last line item on an invoice:

Option 2: Add the fuel levy as a service line
If you don’t want to set up an item, or if you calculate the levy differently each time, for example as a percentage of the invoice total or freight, just add a free‑text service line on a service layout invoice.
Create an invoice (Sales command centre > Enter Sales) or open an existing unpaid service layout invoice.
If it's a new invoice, click Layout, choose Service then click OK.
Choose the Customer and add the products or services you’re invoicing for.
On a new, empty line:
In the Description column, type something like Fuel levy (or similar).
In the Account No. column, choose the income account you want to use for fuel levy income. If needed you can create an income account for this purpose.
In the Amount column, enter the fuel levy amount you want to charge on this invoice, for example a percentage of the invoice or freight total.
Check the Tax/GST code is correct.
Review the Subtotal, Tax/GST and Total Amount at the bottom of the invoice.
Click Record.
Making a fuel levy invoice template
If you apply a fuel levy to lots of invoices, you can create a recurring invoice. This is like an invoice template that contains all the details you need, including the fuel levy, so you don’t need to add those details each time you create an invoice. More about recurring transactions.
Create an invoice and add the fuel levy as described above or open an existing invoice which contains the fuel levy.
At the bottom of the invoice, click Save as Recurring.
Enter a Recurring Transaction Name. This is the name for the recurring invoice template, like Fuel Levy Invoice or similar.
For the Frequency, choose Never. More about scheduling recurring transactions.
Click OK.
To use the template to create an invoice
Create a new invoice (Sales command centre > Enter Sales).
At the bottom of the invoice, click Use Recurring.
Click the invoice template you created and click Select. The invoice is populated with all the details from the template – including the fuel levy.
Make any required changes and record the invoice as normal.
Keeping your fuel levy up to date
Fuel prices change, so review your levy regularly to make sure:
the amount is still appropriate
the name is clear and accurate for customers
the Tax/GST code still reflects current tax advice.
To update a fuel levy item
Go to the Inventory command centre > Items List and open your Fuel levy item.
Update the Name, Base Selling Price or Tax/GST Code When Sold as needed.
Click OK.
Changes you make to the item apply to new invoices going forward. Existing invoices and historical reports don’t change.
For service layout invoices, just update the description or amount directly on each invoice as you go.